Q: How can I make an appointment?
A: Follow the steps below to create a new appointment:
-
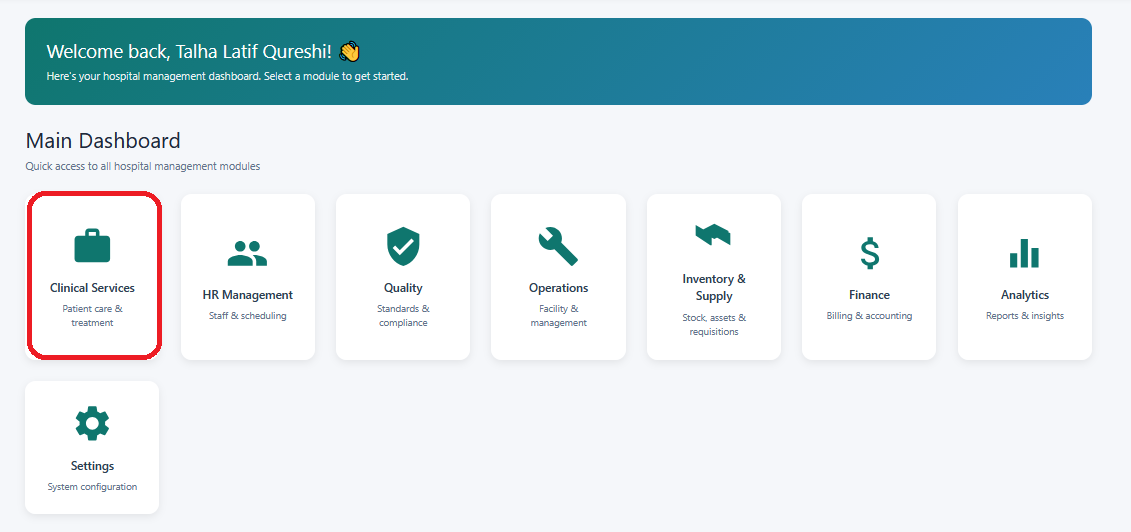
After logging into the software, the Main Dashboard will be displayed. Click on the Clinical Services button (shown in the highlighted box).
-
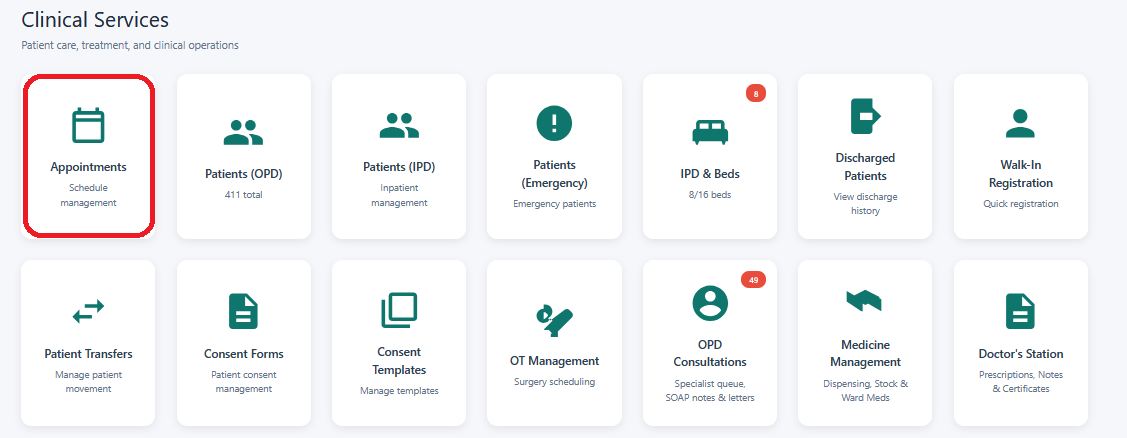
On the next screen, click on the Appointment button (shown in the highlighted box).
-
The Appointment Window will open, allowing you to create a new appointment for the patient, after clicking on the Book New Appointment Button.

-
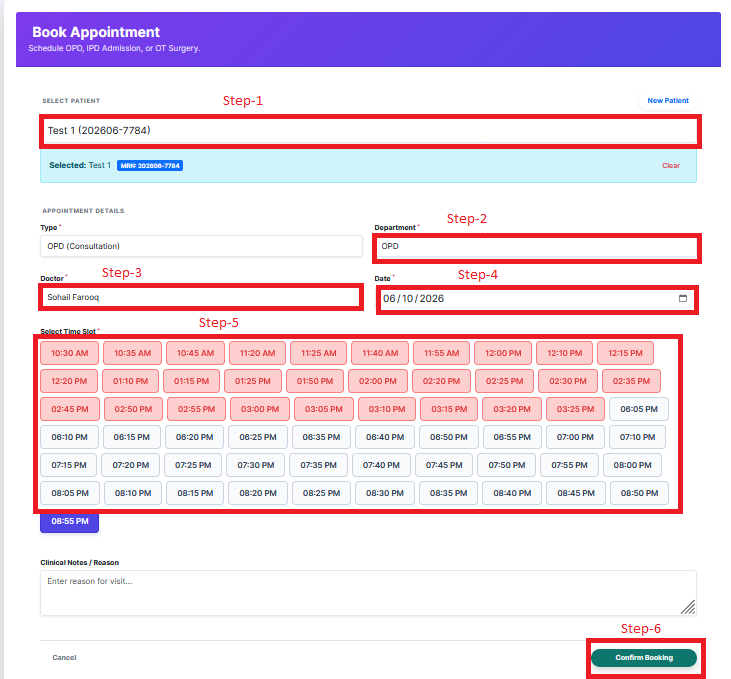
If the patient already exists in the system, select the appropriate OPD Timing, Doctor, and Department from the available options.
5.If the patient does not exist in the system, enter the patient's required all details such as Name, CNIC, Contact Number, Gender, Age, and any other mandatory information.
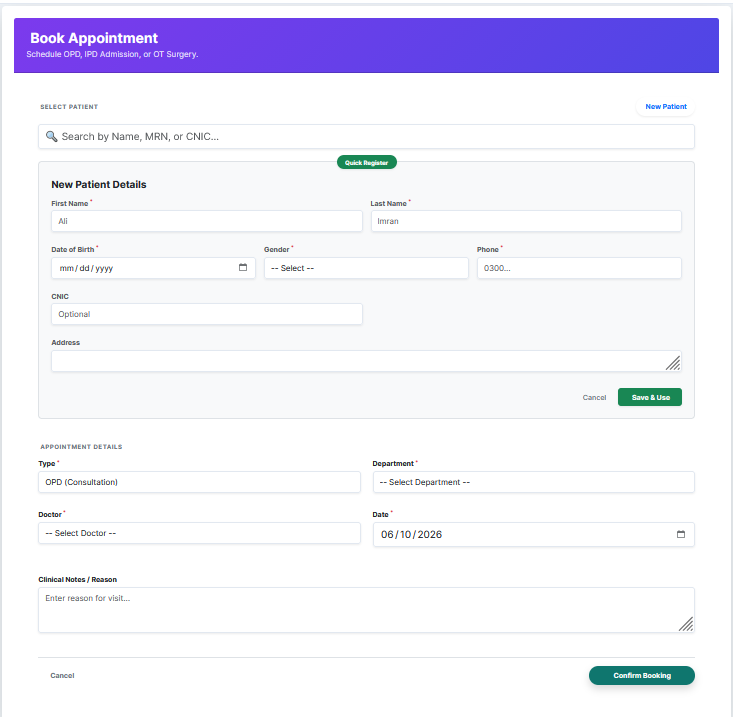
After completing all required information, click Save or Confirm Appointment to successfully create the appointment.
Q: How can I add a patient?
A: Follow the steps below to add a new patient:
-
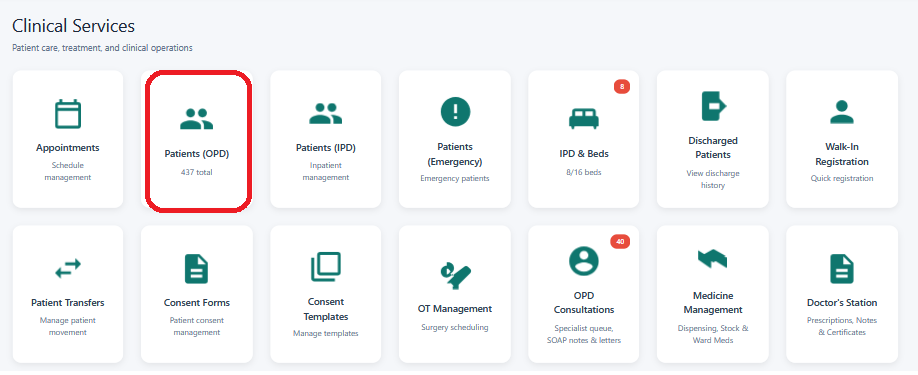
From the Main Dashboard, click on the Clinical Services button (shown in the highlighted box), then select Patient(OPD).
-
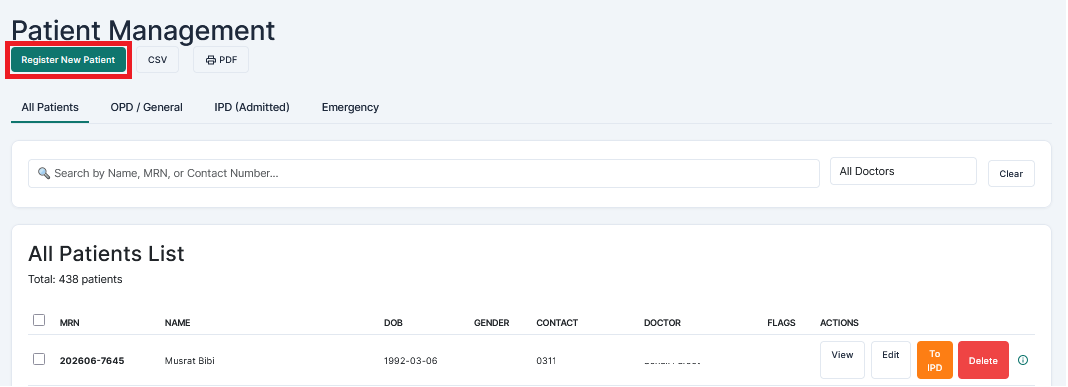
On the Patient screen, click the Add Patient button (shown in the highlighted box).
-
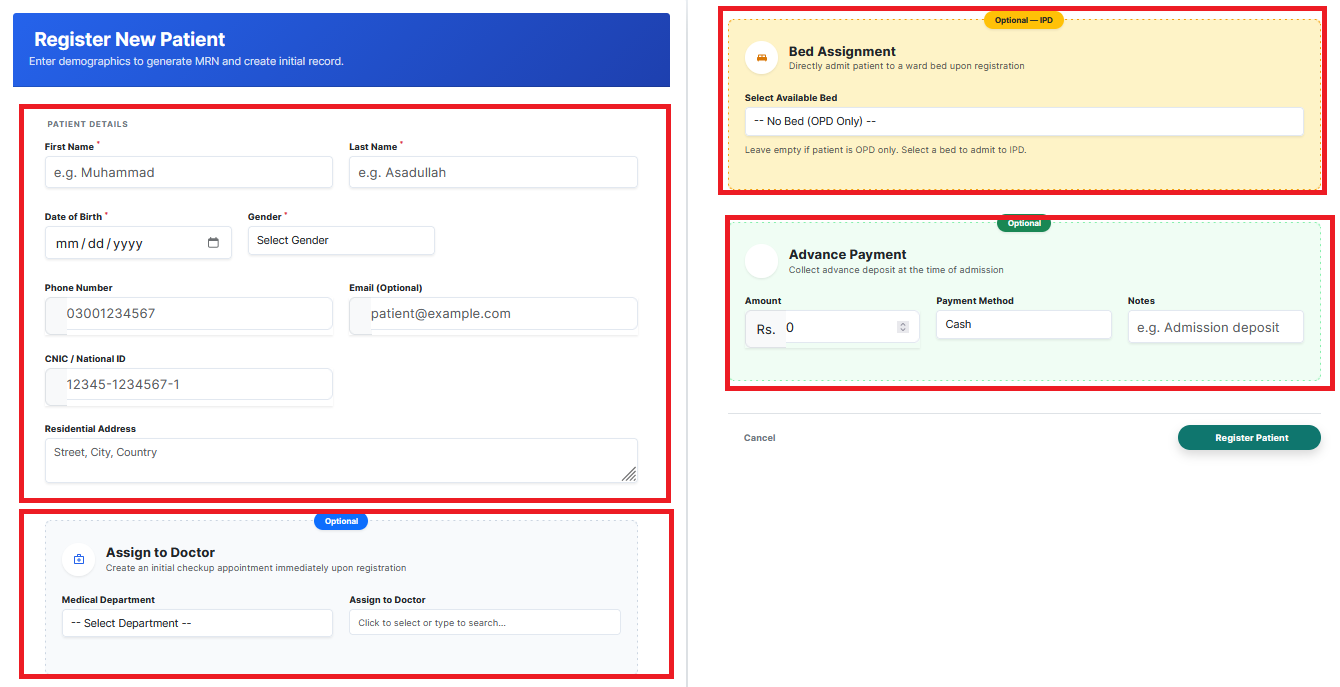
Enter all required patient information in the provided fields. You can also add patients for the IPD and Emergency Department through this screen.
-
After completing all required information, click Register to add the patient to the system successfully.
Note: Any button or section shown in a highlighted box should be clicked to proceed to the next step.
Q: How can I admit an OPD patient to IPD and assign a bed and doctor for further treatment?
A: Follow the steps below to admit an OPD patient to IPD:
- Go to the Clinical Services and open the Patient(OPD) option.
-
Go to the Patient (OPD) list and locate the required patient.
-
Click on the patient record (shown in the highlighted box) to view the patient's details.
-
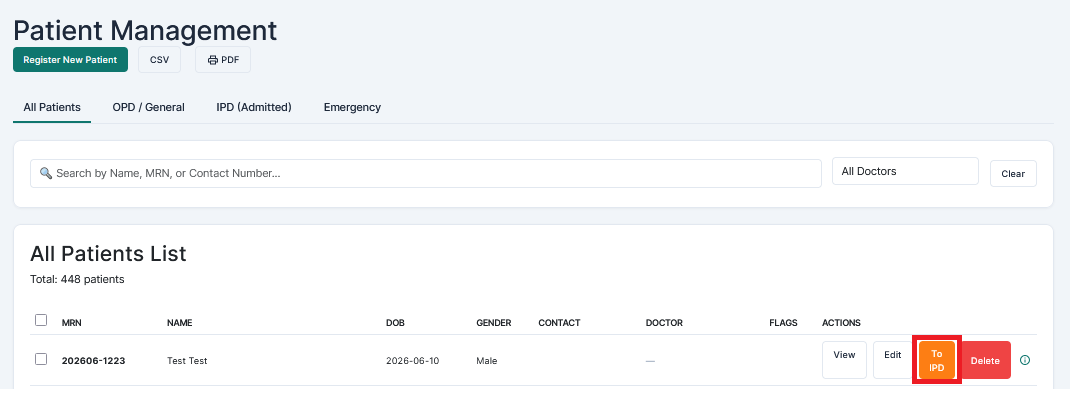
From the patient details screen, click the To IPD button (shown in the highlighted box).
-
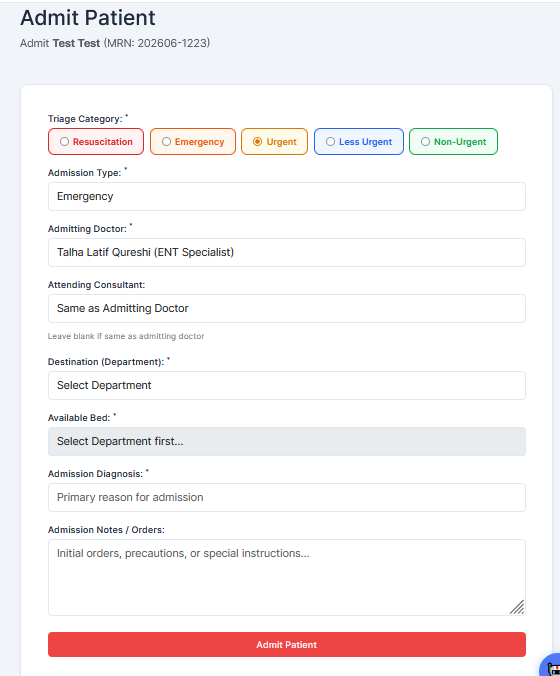
The IPD Admission window will open. Select the required Department, Ward, Bed, Doctor, and other options for the patient's treatment.
-
Enter any additional admission details if required.
-
Click Save or Confirm Admission to admit the patient to IPD successfully.
-
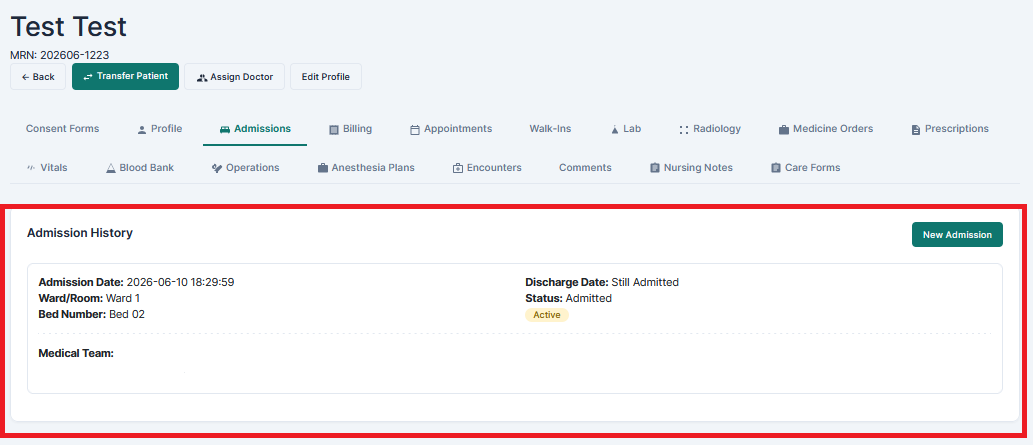
Once the admission is completed, the patient will be assigned to the selected bed and doctor for further treatment and the admission history will be shown
Note: Any button or section shown in a highlighted box should be clicked to proceed to the next step.
Q: How can I discharge a patient who is already admitted to the hospital?
A: Follow the steps below to discharge an admitted patient:
-
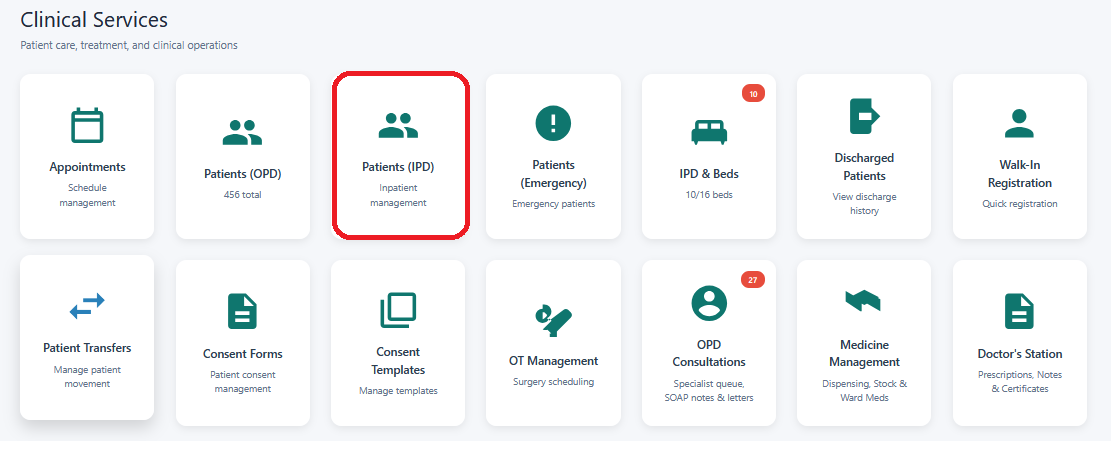
Go to the Patient (IPD) list and locate the admitted patient.
-
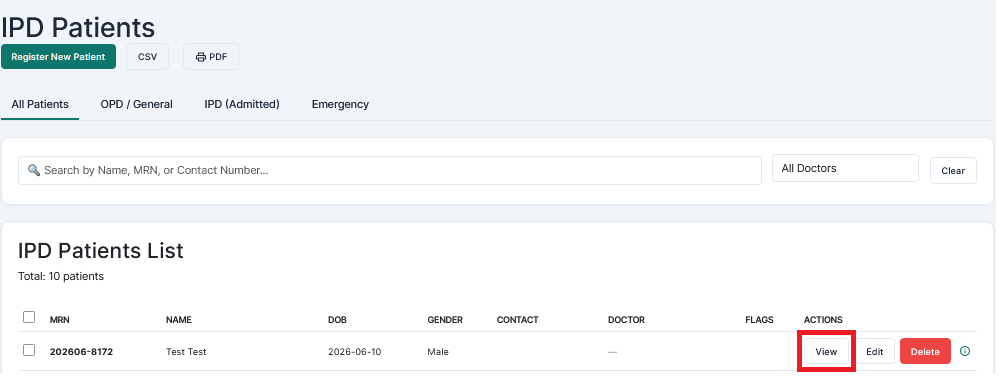
Click the View button (shown in the highlighted box) to open the patient's details.
-
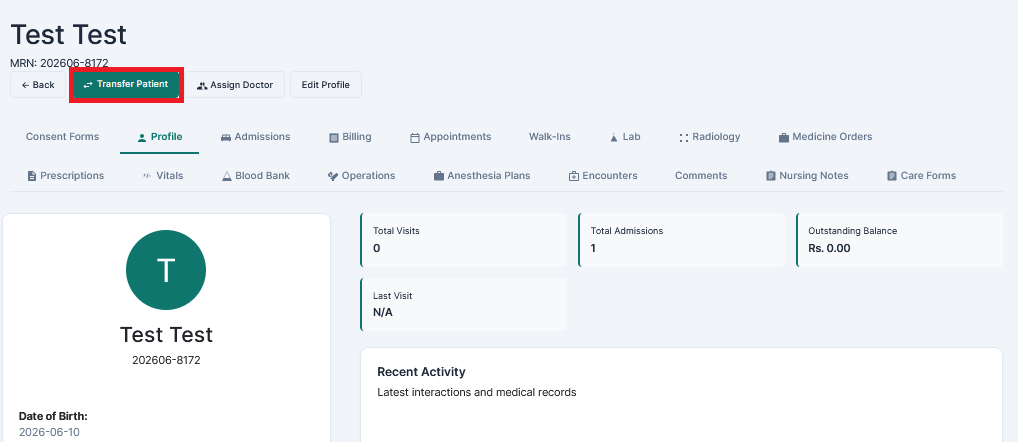
From the top navigation bar, click on Transfer Patient (shown in the highlighted box).
-
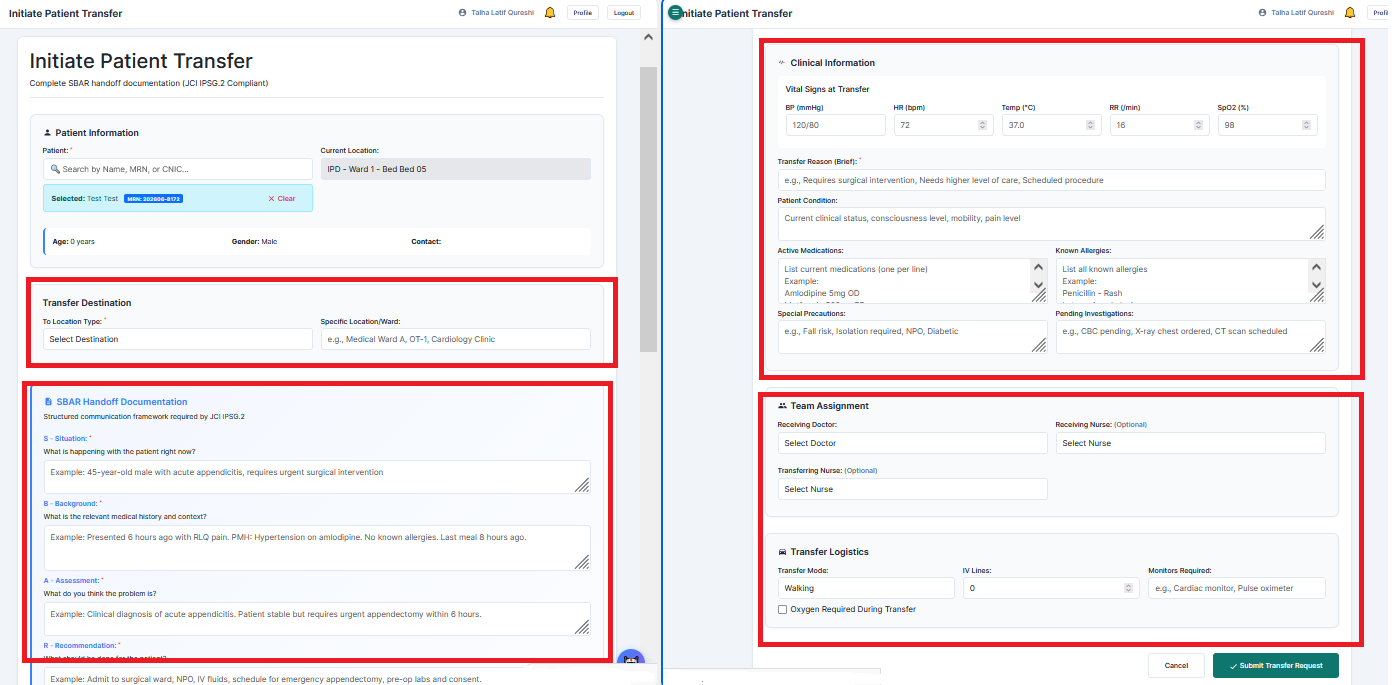
Complete all required transfer/discharge information and click Submit for Approval.
-
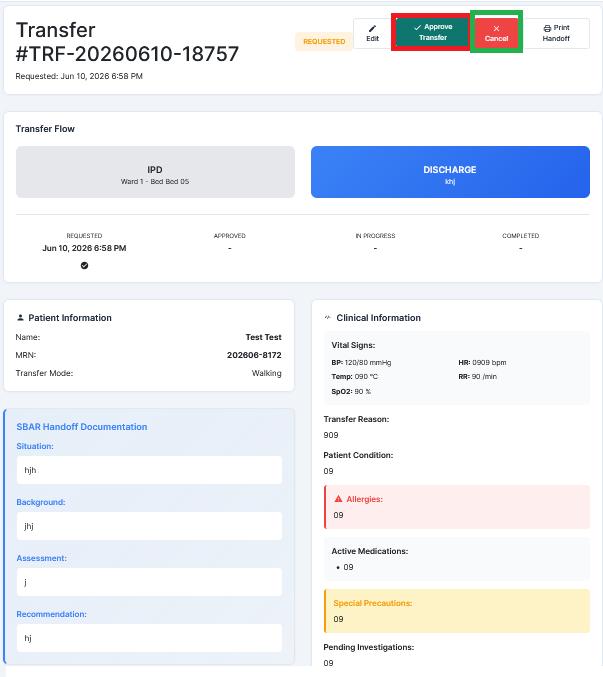
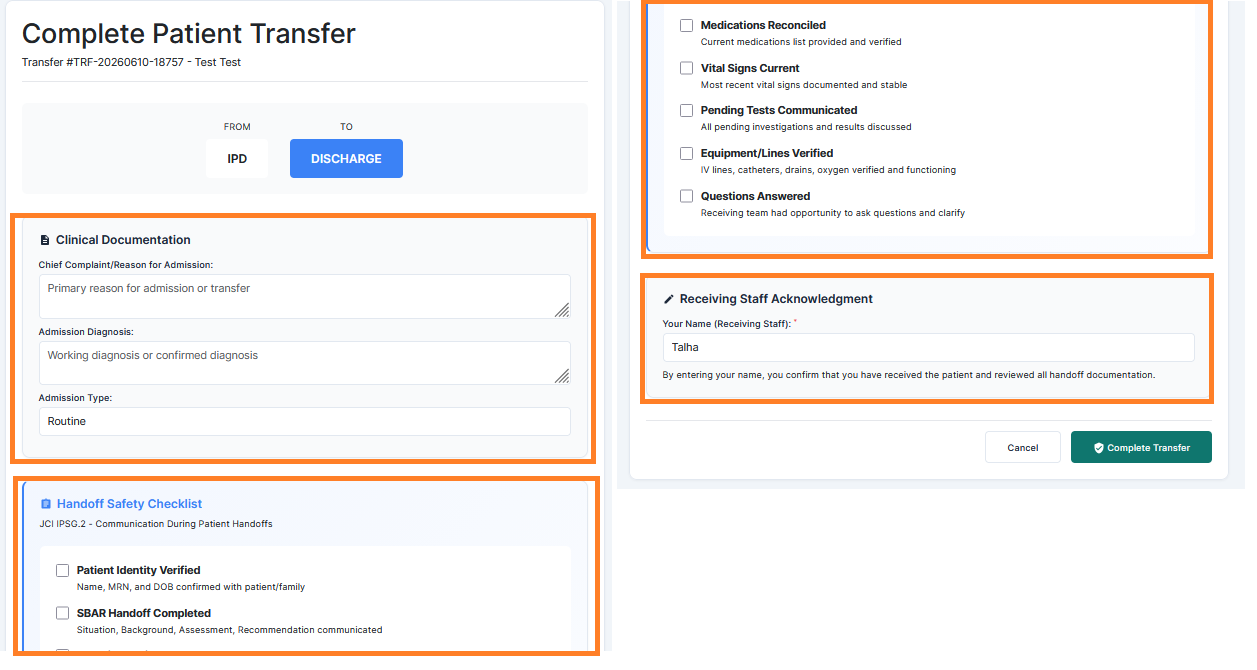
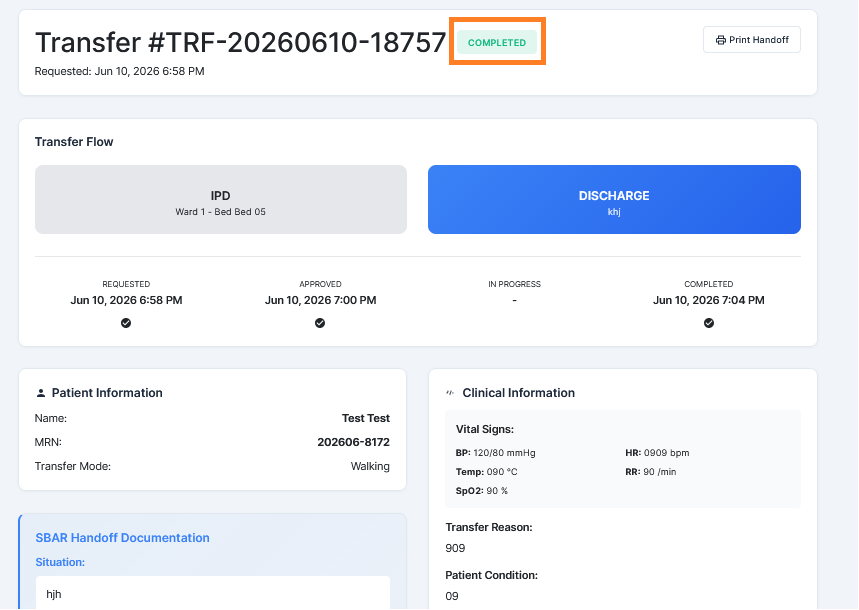
Once the discharge request has been reviewed, it can either be Approved or Cancelled. If the request is Cancelled, the discharge process will be stopped and the patient will remain admitted in the hospital. If the request is Approved, the process will proceed to the next stage, and the Complete Transfer option will become available to finalize the patient's discharge.
-
-
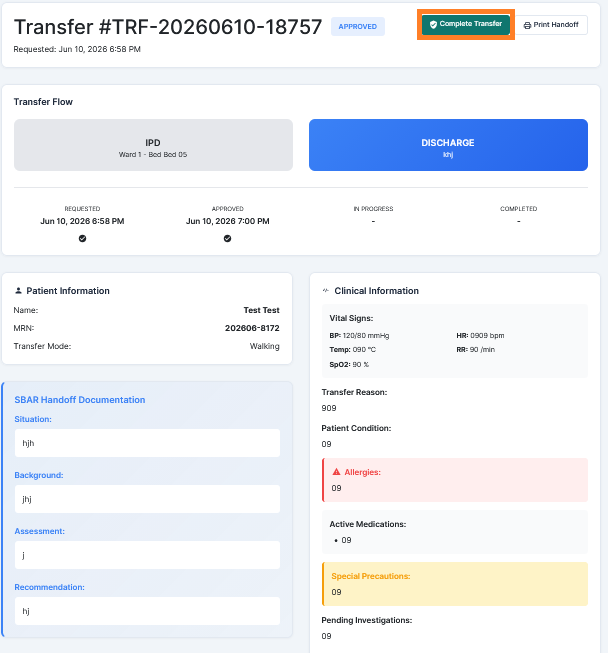
Click Complete Transfer (shown in the highlighted box).
-
Fill in all required discharge details, including any notes, remarks, or final treatment information.
-
Click the Final Complete Transfer button to successfully discharge the patient from the hospital.
Note: Any button or section shown in a highlighted box should be clicked to proceed to the next step.
Q: If transfer approval authority is not assigned to a specific user, how can another authorized person approve a transfer?
A: Follow the steps below to approve a transfer request:
-
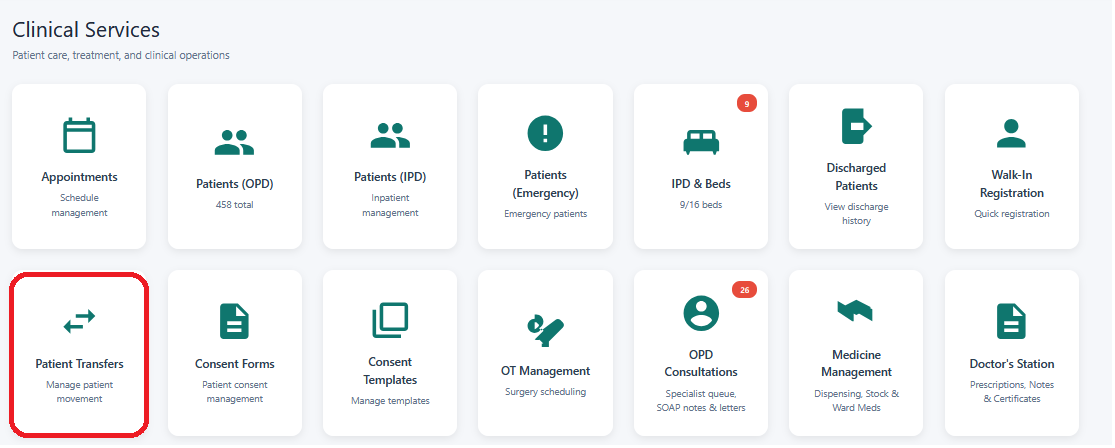
Go to the Clinical Services Dashboard and open the Transfer Patient module.
-
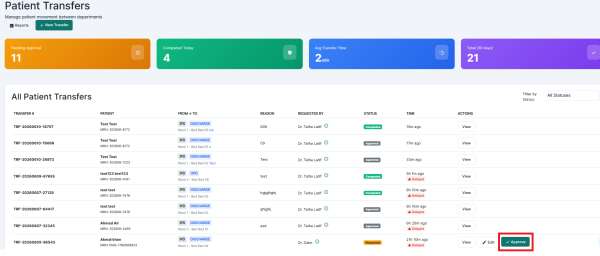
A list of all transfer requests will be displayed.
-
Locate the required patient from the list and click the Approve button available in the Action column (shown in the highlighted box).
-
Once the Approve button is clicked, the transfer request will be sent for approval and processed by the authorized person in the system.
-
-
After successful approval, the patient transfer status will be updated accordingly and the process will move to the next stage.
Note: Only users with the required authorization can approve transfer requests. If the request is not approved, the patient transfer will not proceed.
Q: How can I create a consent form?
A: Follow the steps below to create a consent form:
-
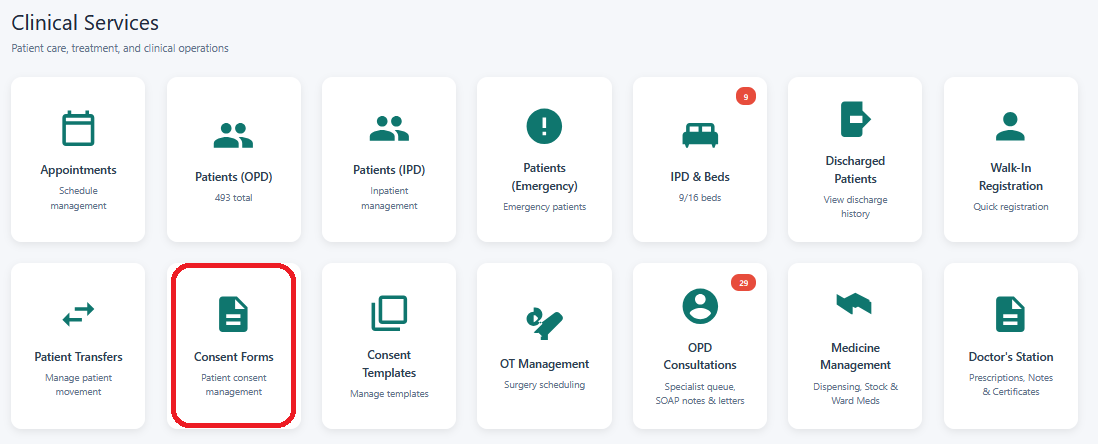
Go to Clinical Services and select the Consent Form option (shown in the highlighted box).
-
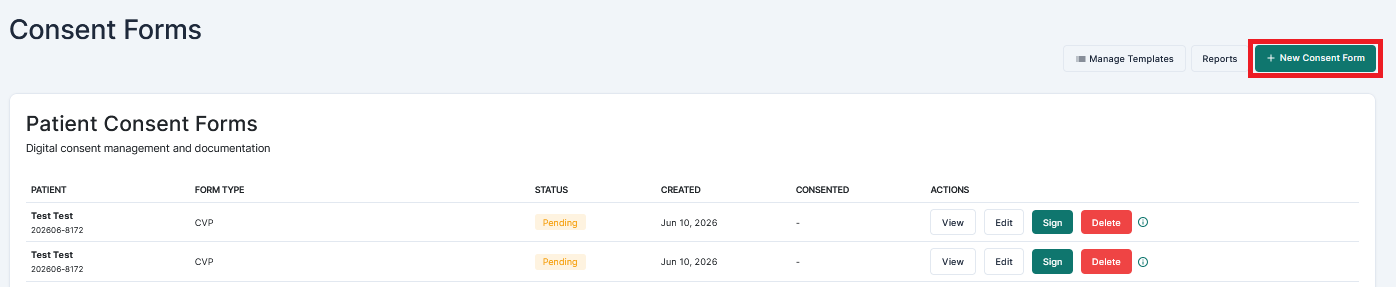
From the top-right navigation bar, click the New Consent Form button (shown in the highlighted box).
-
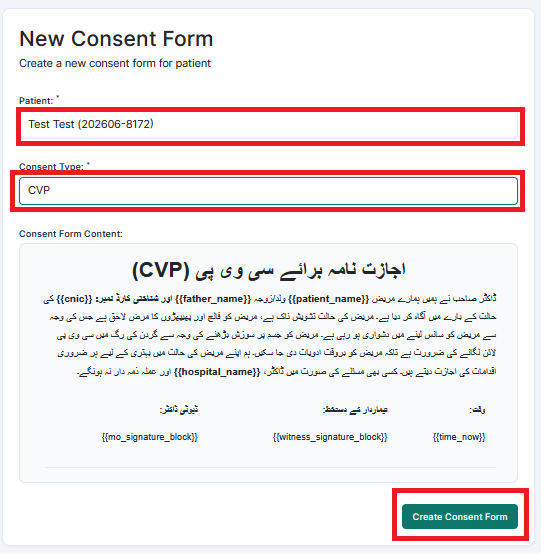
Fill in all the required information and patient details.
-
Click Create Consent Form to generate the form.
-
Review the information and save the form to complete the process.
- After creating the form, click Sign Consent Form and complete the required signature process to finalize the consent form.If you delete the form, click the delete button, and the form is deleted.
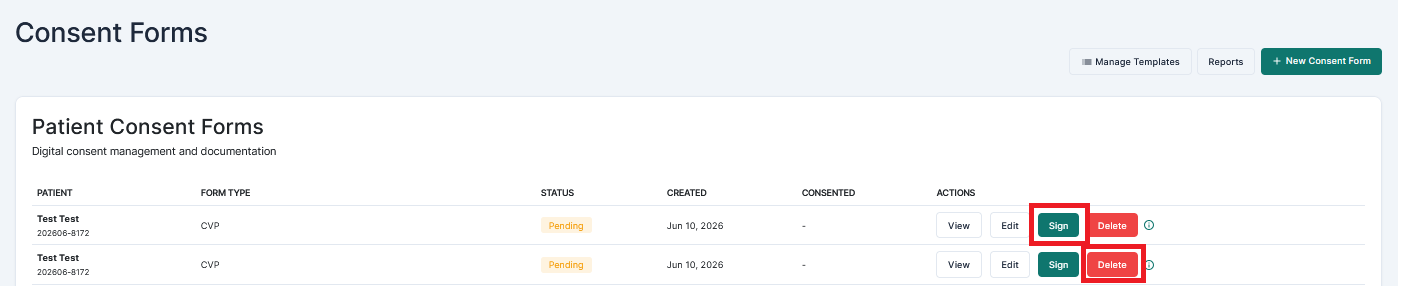
- If you click the Sign button, fill in all the required details and complete the signature process to finalize the consent form.
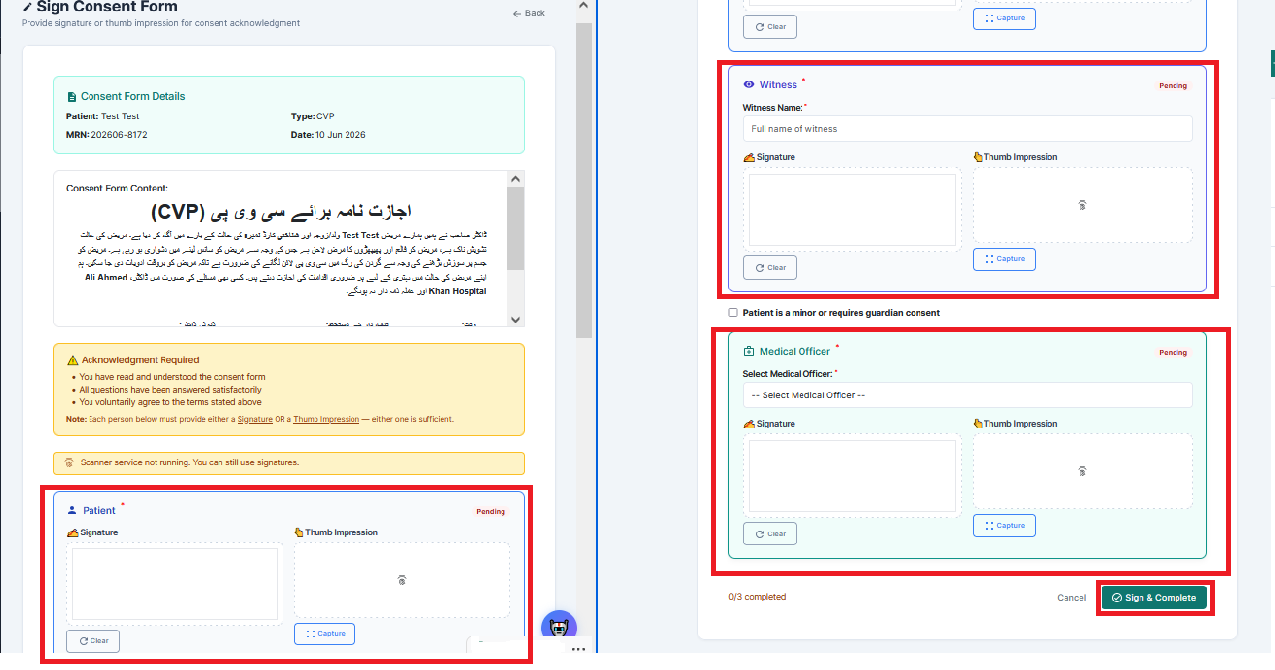
Note: Any button or section shown in a highlighted box should be clicked to proceed to the next step.
Q: How can I create a consent template?
A: Follow the steps below to create a consent template:
-
Go to Clinical Services and select the Consent Template option (shown in the highlighted box).
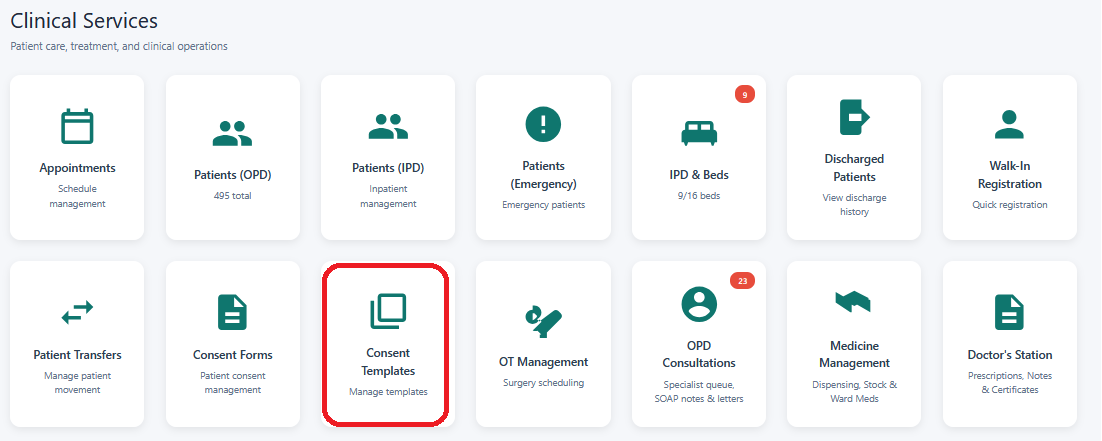
-
From the top-right navigation bar, click the Add New Template button (shown in the highlighted box).

-
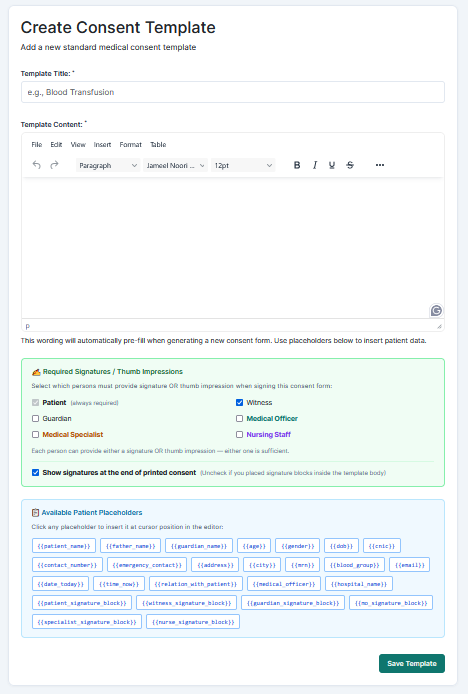
Enter all the required template details, including the template name, description, and consent content.
-
In the last section of the window, you will find a list of Variables.
-
You can insert these variables into the consent template wherever required. When the consent form is generated, the system will automatically replace the variables with the corresponding patient, doctor, or appointment information.
-
After completing the template content and adding the required variables, click Save to create the consent template successfully.
Note: Any button or section shown in a highlighted box should be clicked to proceed to the next step.
Q: How can I schedule a surgery?
A: Follow the steps below to schedule a surgery:
Go to the Clinical Services Dashboard and select the OT Management option (shown in the highlighted box).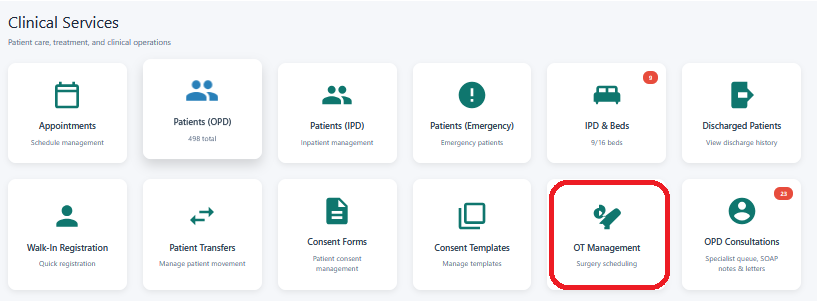
From the top navigation bar, click the Schedule Surgery button (shown in the highlighted box).
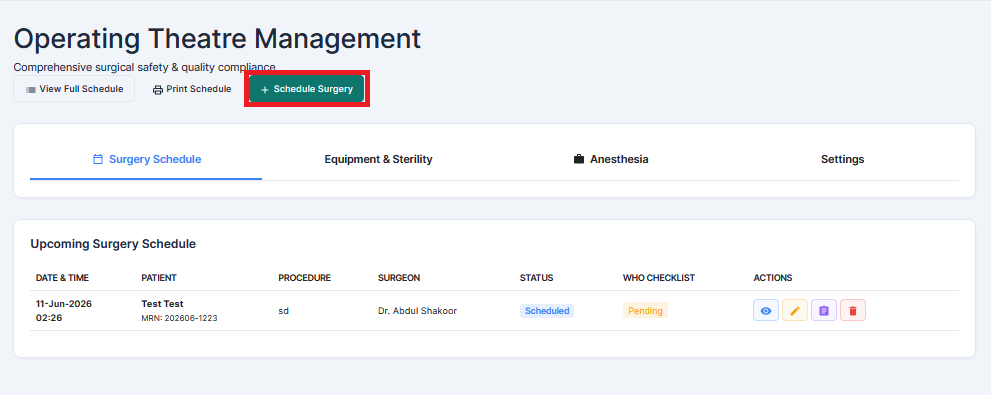
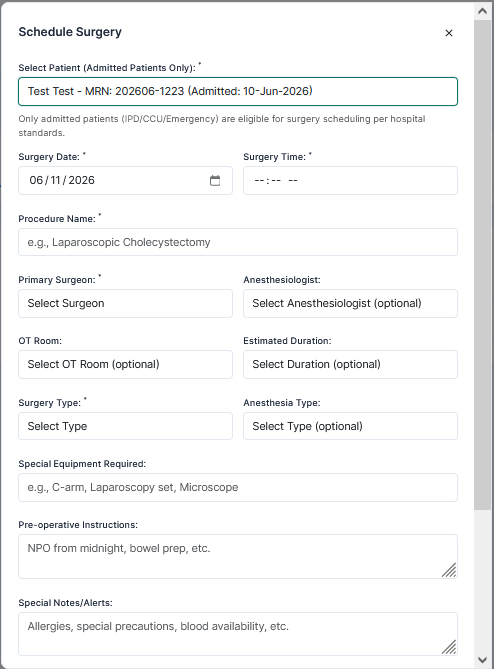
Fill in all the required surgery details and click Save to schedule the surgery.
After the surgery is scheduled, it will appear in the surgery list.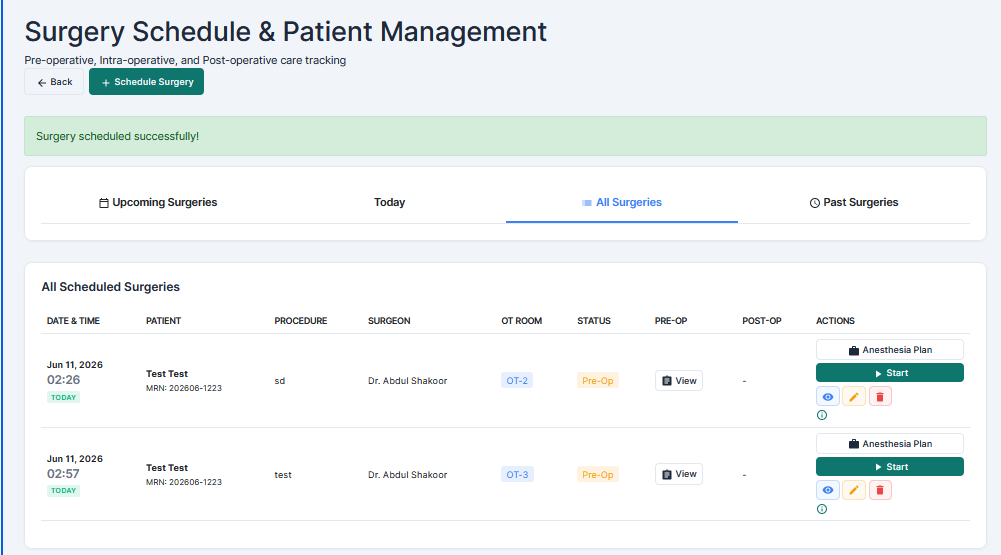
From the surgery list, click the Plan Anesthesia button (shown in the highlighted box).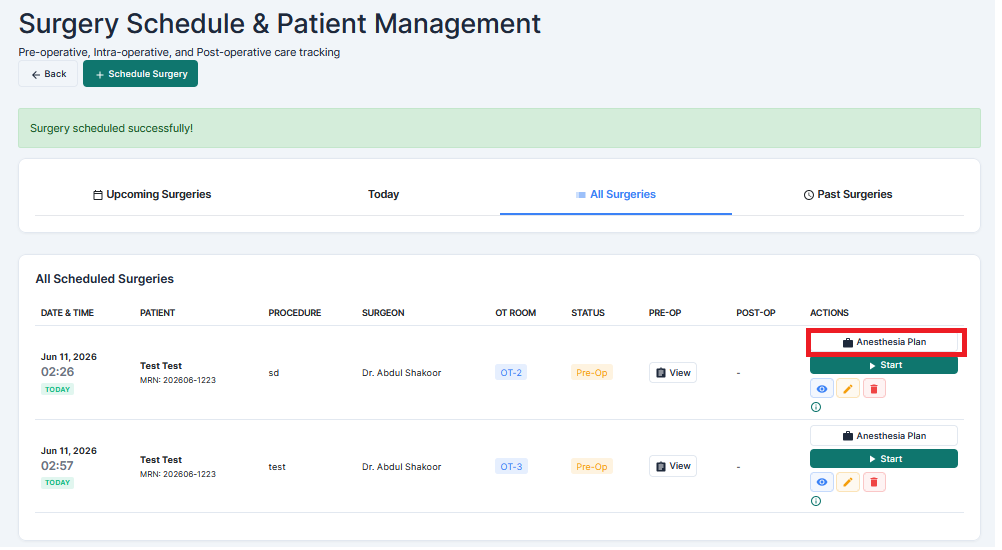
Fill in all the required anesthesia details and click Save.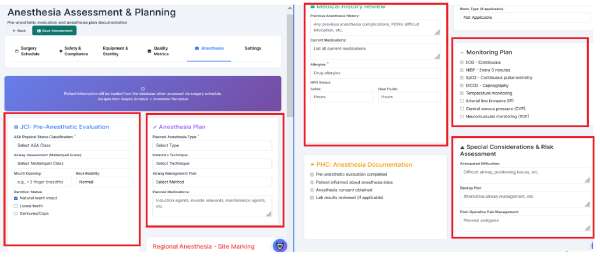
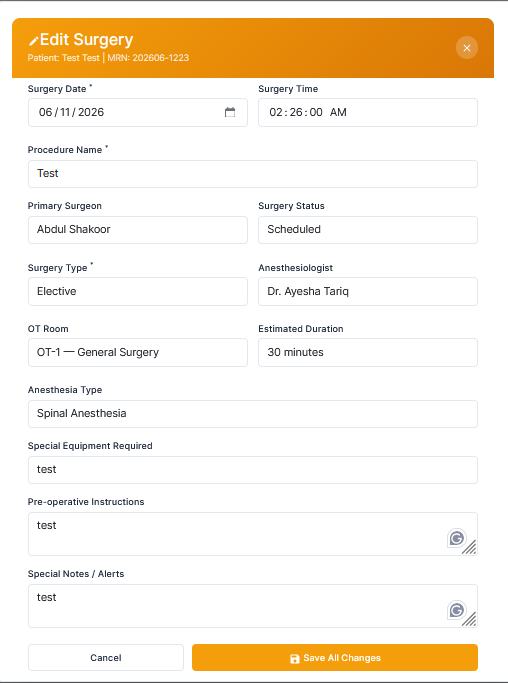
After saving, the scheduled surgery record will display Edit and View buttons in the Action column.
Click the Edit button to update or modify the surgery information.
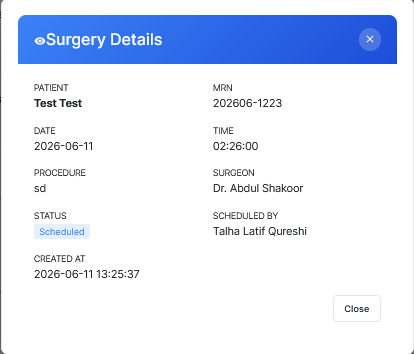
Click the View button to view the complete surgery and anesthesia details.
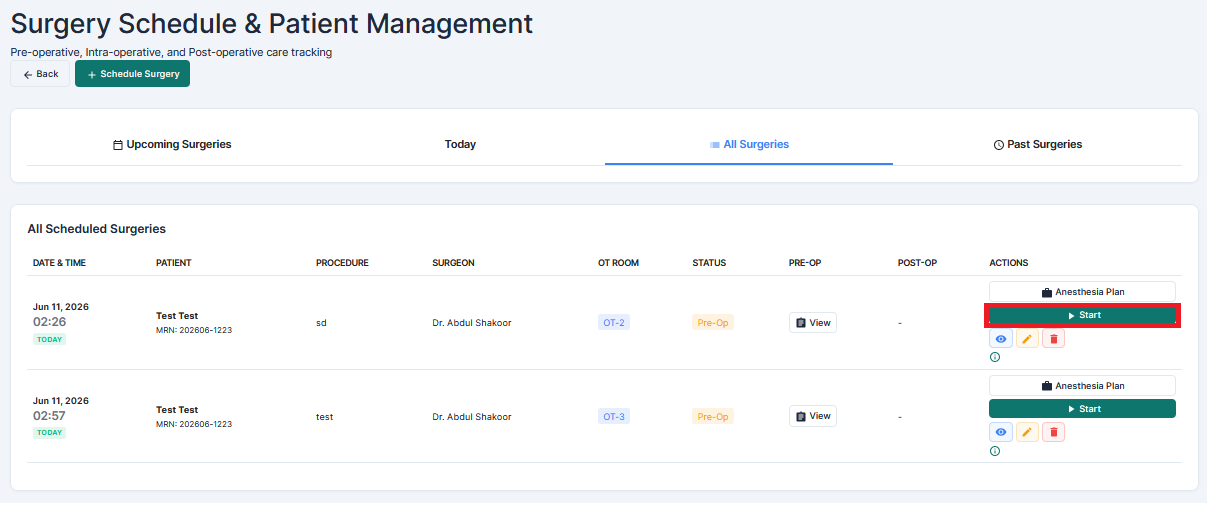
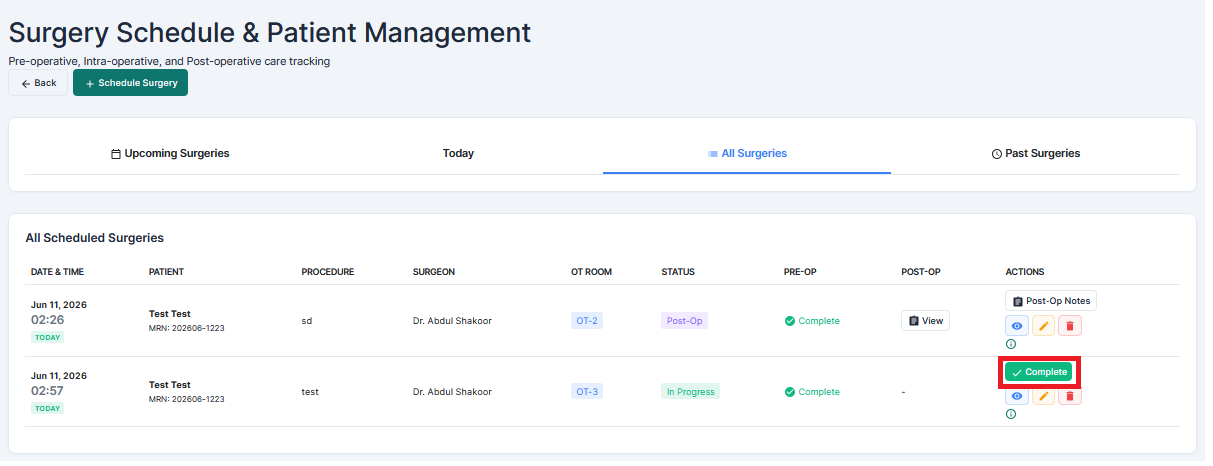
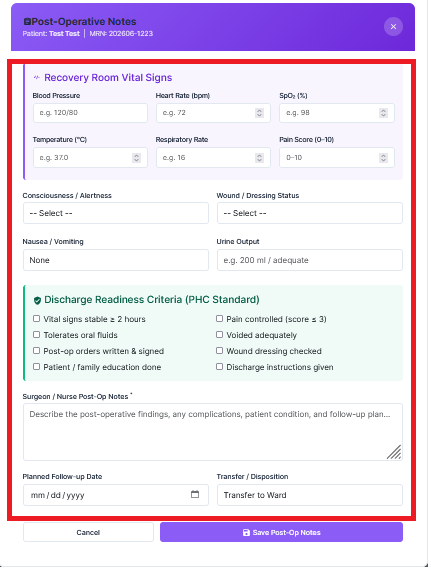
when you click on start button they surgeyr is start after thetat on clicking they show a complte button shown .when you click on complete button they showed us the surgery is cpmpleted.after tat when i click on pop-op ntes to fill the required notes
asd
adf
Note: Any button or section shown in a highlighted box should be clicked to proceed to the next step.
Q: How can I add equipment and manage sterilization records?
A: Follow the steps below to add equipment and manage sterilization records:
-
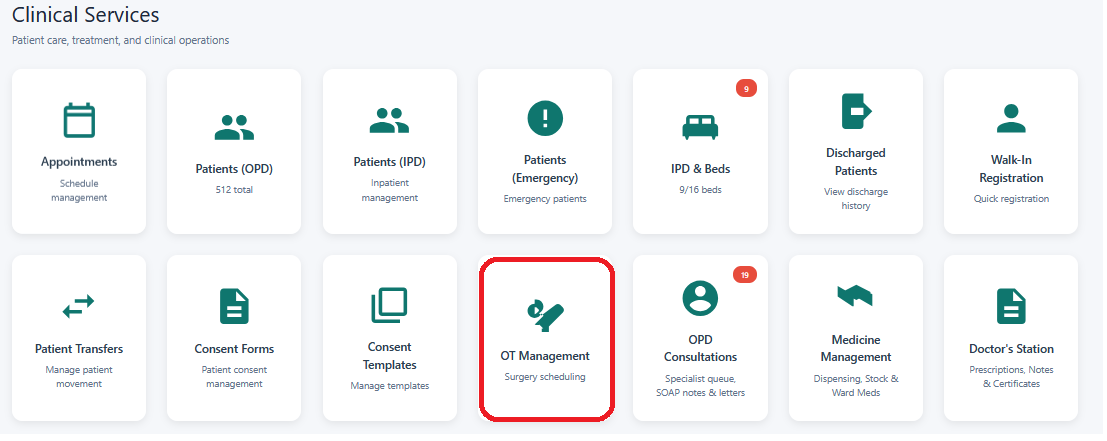
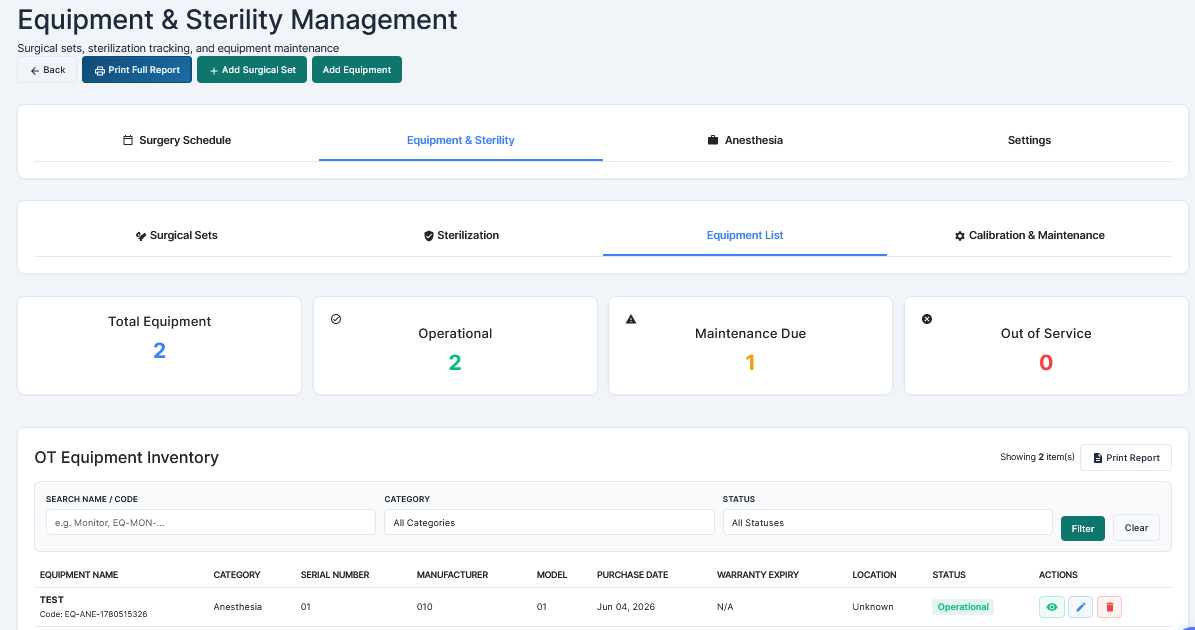
Go to the Clinical Services Dashboard and select the OT Management option (shown in the highlighted box).
-
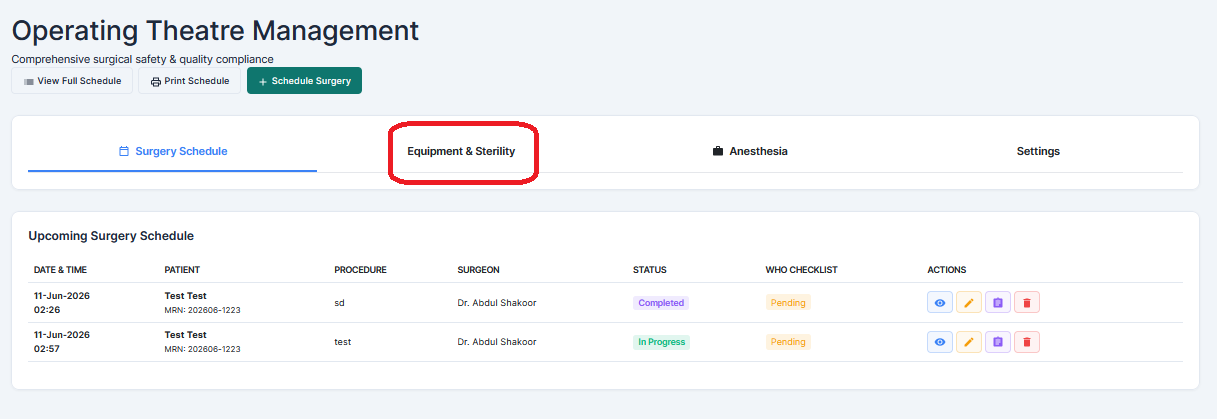
Click on the Equipment & Sterility option.
-
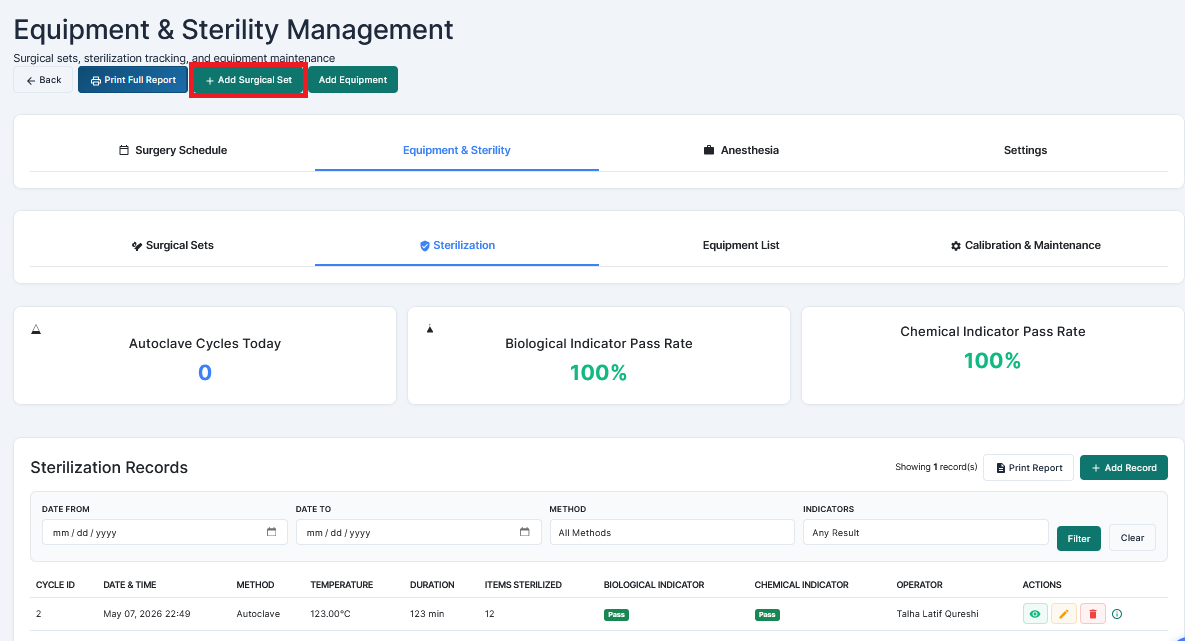
From the top navigation bar, click the Add Surgical Set button (shown in the highlighted box).
-
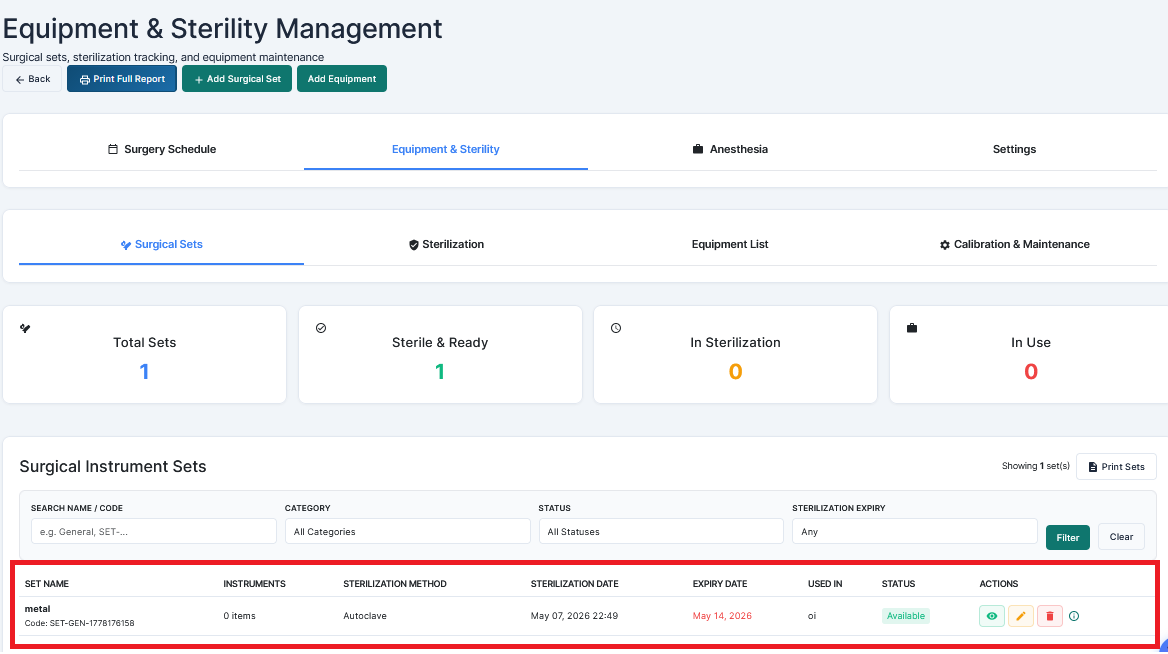
Enter all the required surgical set details and click Save.
-
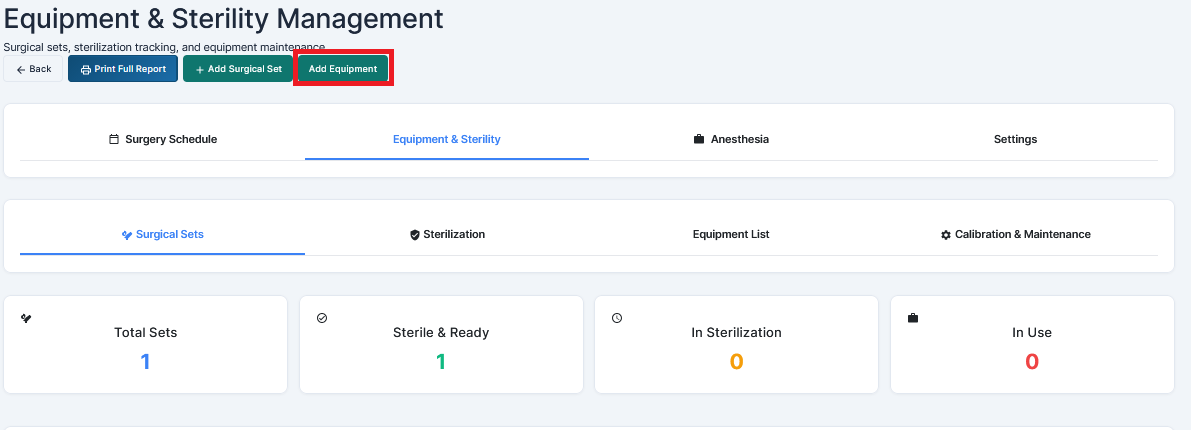
Next, click the Add Equipment button from the top navigation bar (shown in the highlighted box).
-
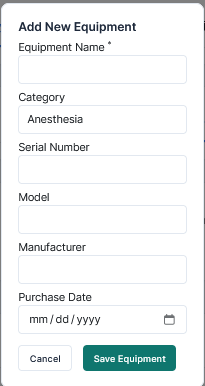
Fill in all the required equipment details and click Save.
-
-
After saving, the equipment list will be displayed.
-
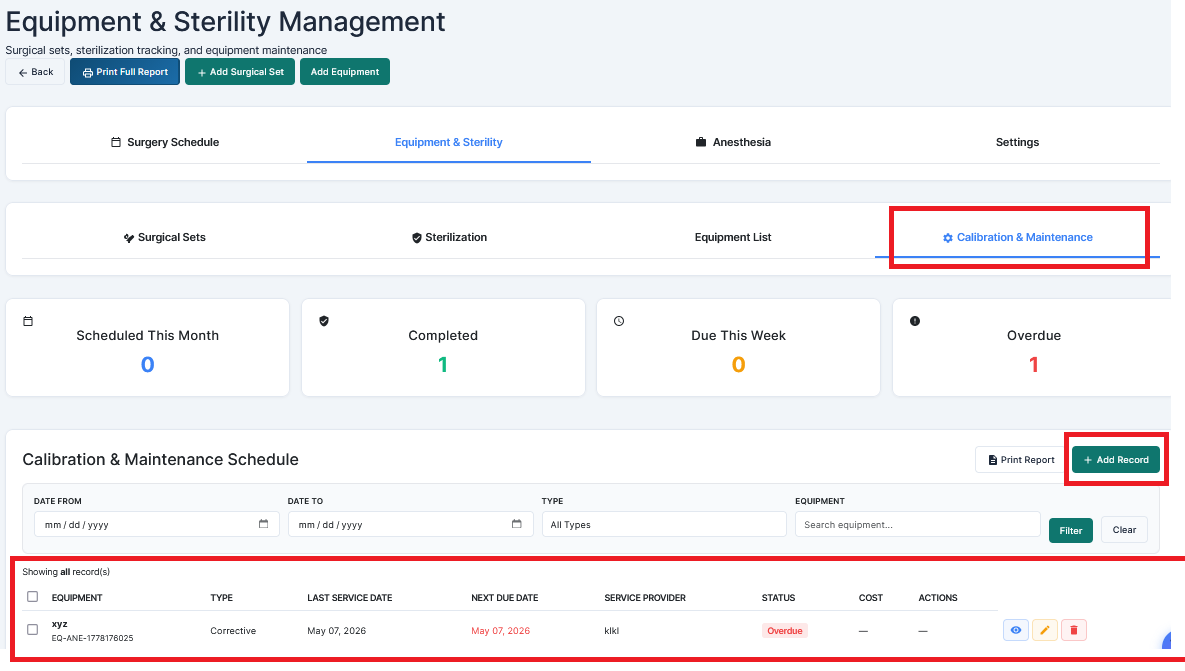
In the Equipment & Sterility Management section, select the Calibration & Maintenance option.
-
Click the Add Record button (shown in the highlighted box), enter the required calibration or maintenance details, and click Save.
-
After saving, the record will appear in the Calibration & Maintenance list.
-
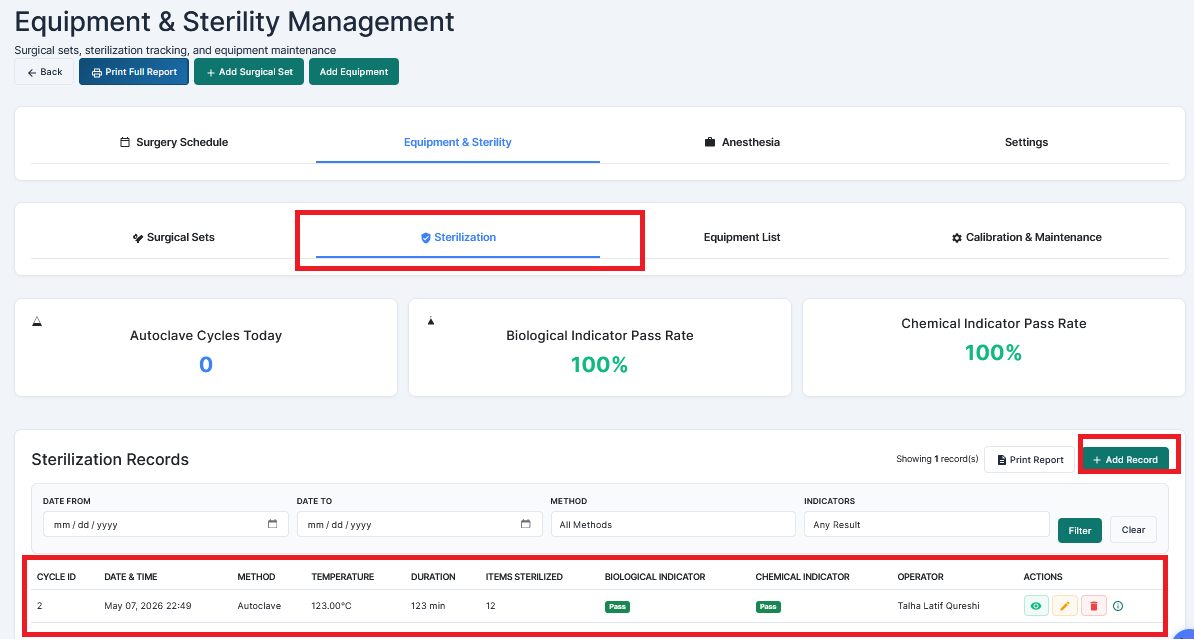
To manage sterilization records, open the Sterilization Process section.
-
Click the Add Record button, fill in all the required sterilization details, and click Save.
-
After saving, the sterilization record will be displayed in the Sterilization Process list.
Note: Any button or section shown in a highlighted box should be clicked to proceed to the next step.
Q: How can I add and manage ambulances?
A: Follow the steps below to add and manage ambulance records:
-
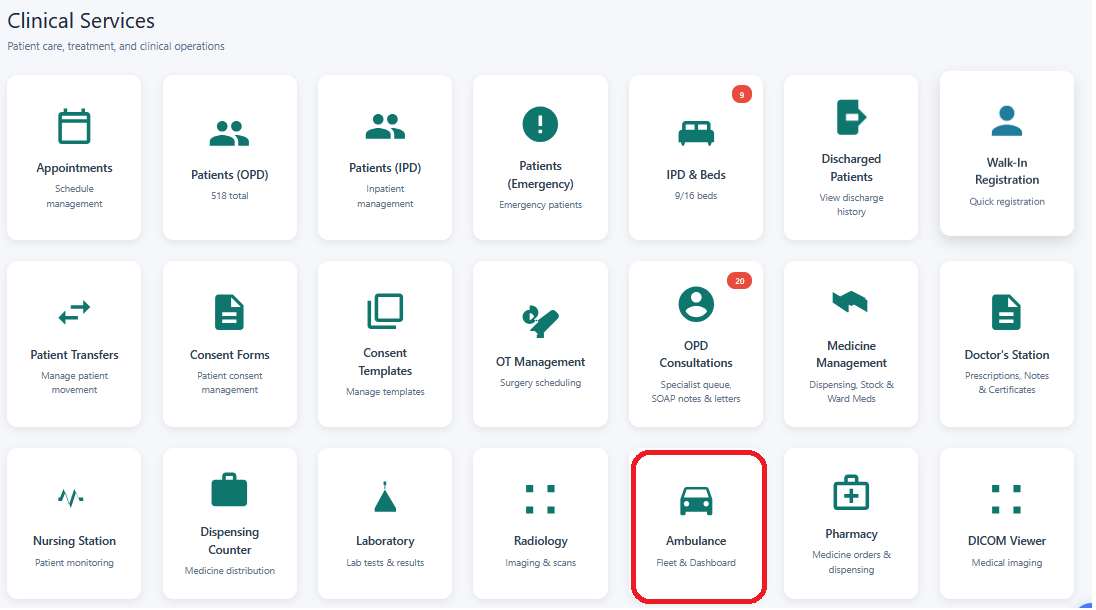
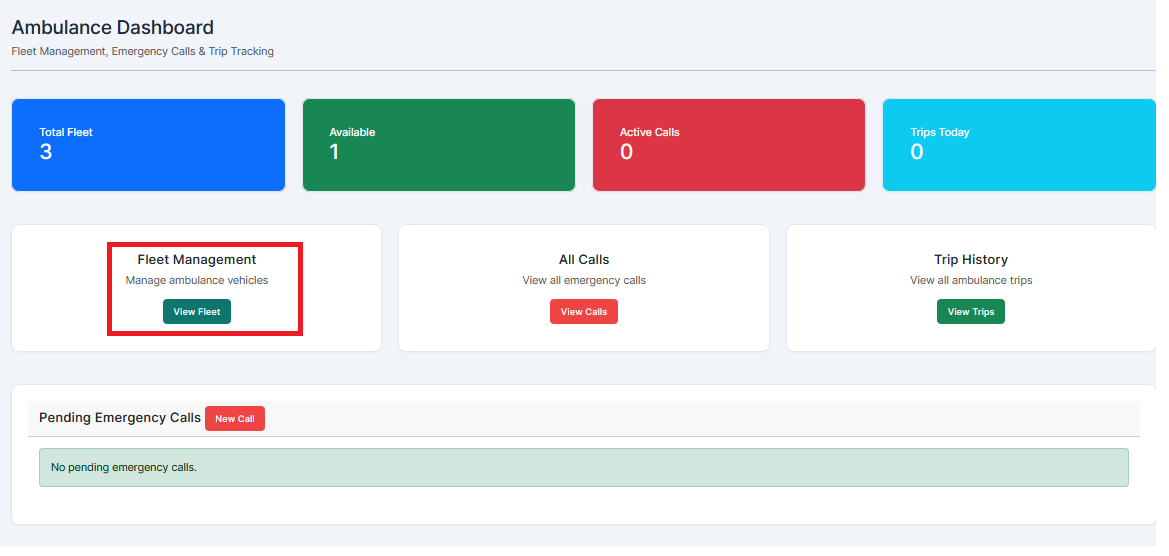
Go to the Clinical Services Dashboard and select the Ambulance option (shown in the highlighted box).
-
Click on the View Fleet button.
-
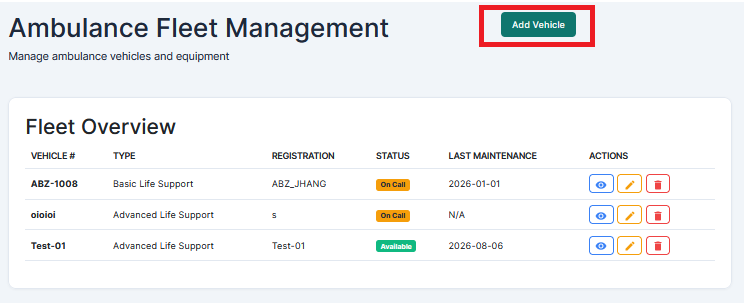
From the top navigation bar, click the Add Vehicle button (shown in the highlighted box).
-
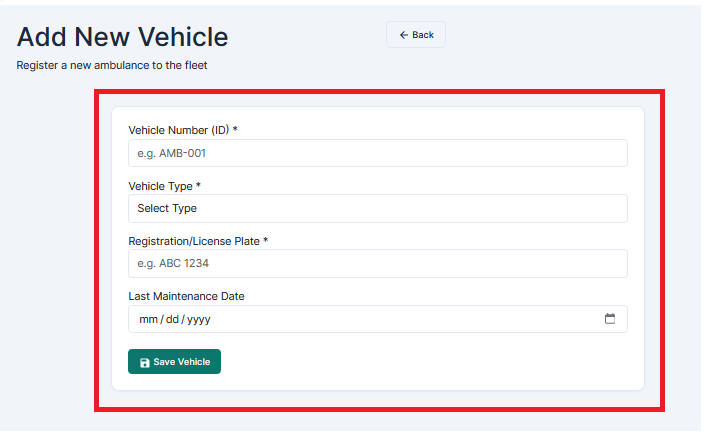
Enter all the required vehicle information and click Save.
-
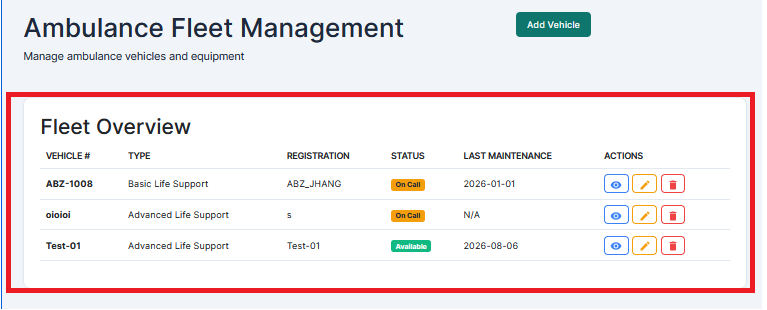
After saving, the vehicle will appear in the fleet list.
-
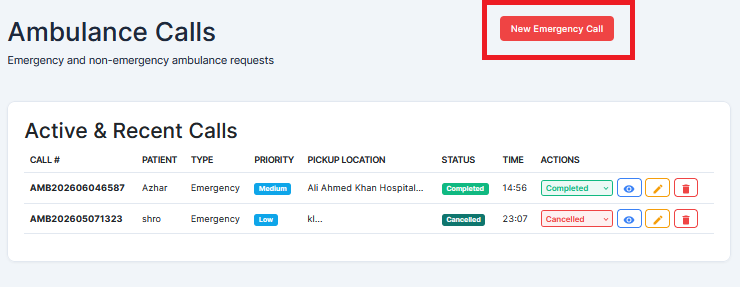
To manage emergency calls, click on the View Calls option.
-
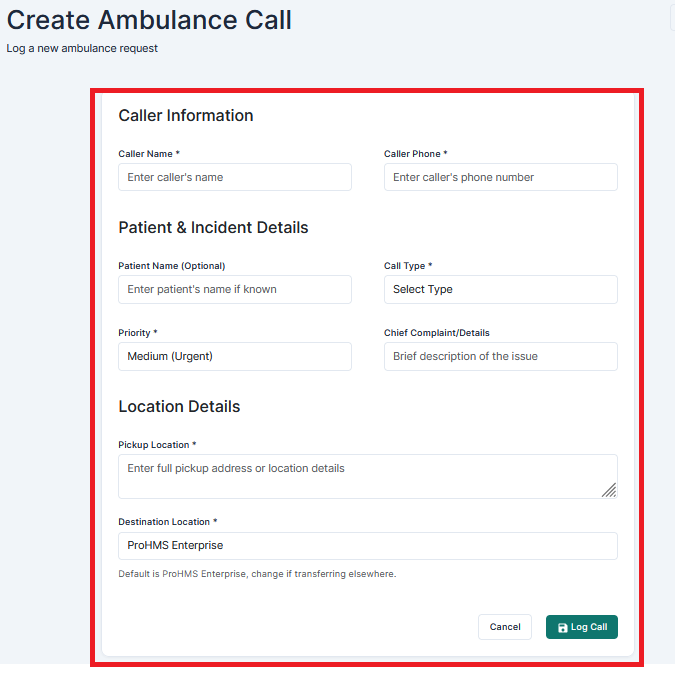
Click the Add New Emergency Call button (shown in the highlighted box).
-
Fill in all the required emergency call details and click Save.
-
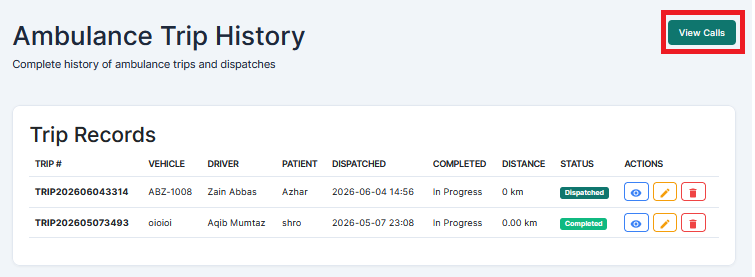
To monitor ambulance activities and trip history, click on the View Trips option.
-
The View Trips section allows you to track and review ambulance trips and related information.
Note: Any button or section shown in a highlighted box should be clicked to proceed to the next step
Q: How can I manage OPD Consultations?
A: Follow the steps below to access and manage OPD Consultation features:
-
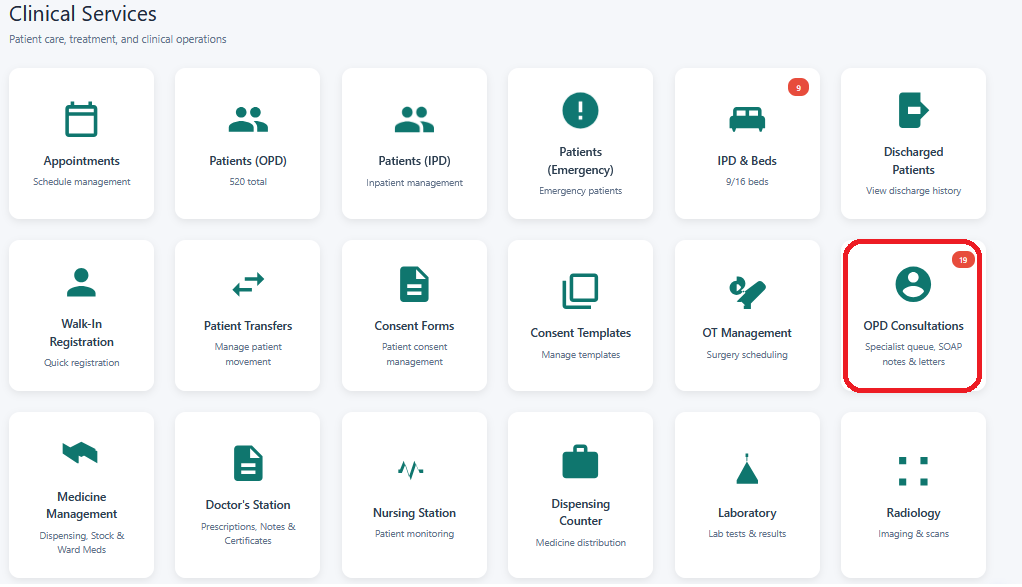
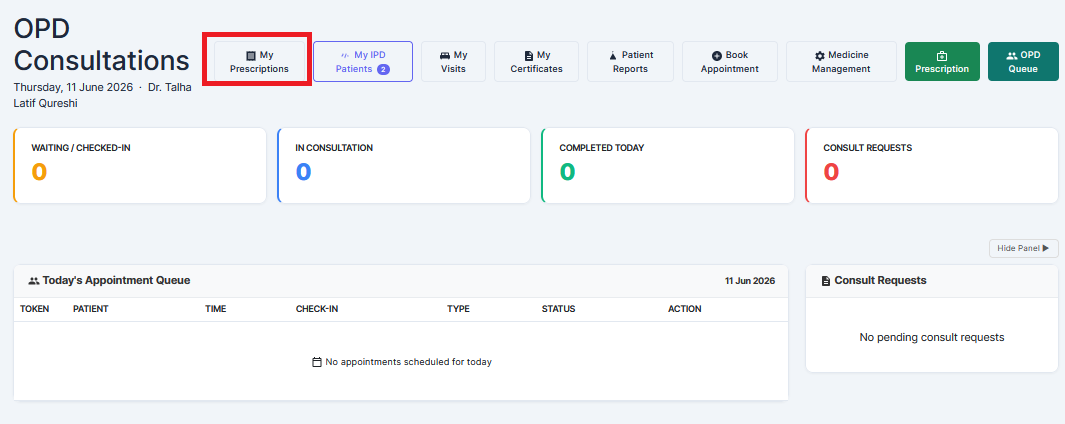
Go to the Clinical Services Dashboard and select the OPD Consultations option (shown in the highlighted box)
-
From the top navigation bar, click on My Prescriptions.
-
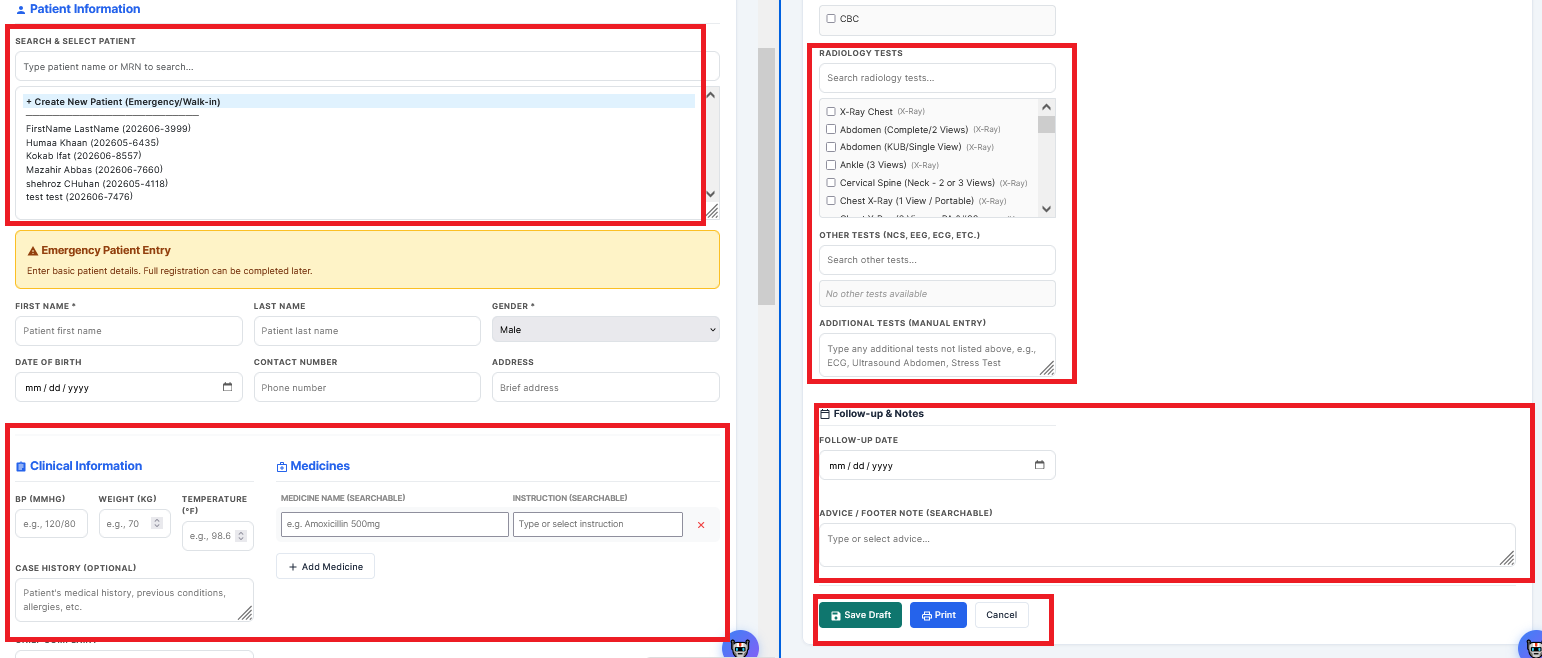
In the My Prescriptions section, click the Add New Prescription button (shown in the highlighted box).

-
Fill in all the required prescription details and click Save.
-
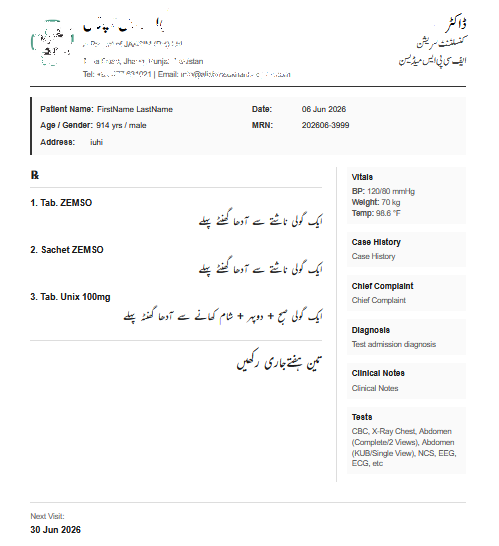
After saving, the prescription list will be displayed. In the Action column, you will find the following options:
-
View – View prescription details.
-
Edit – Update prescription information.
-
Print – Print the prescription.
-
-
Add New Prescription – Create an additional prescription for the patient.
-
-
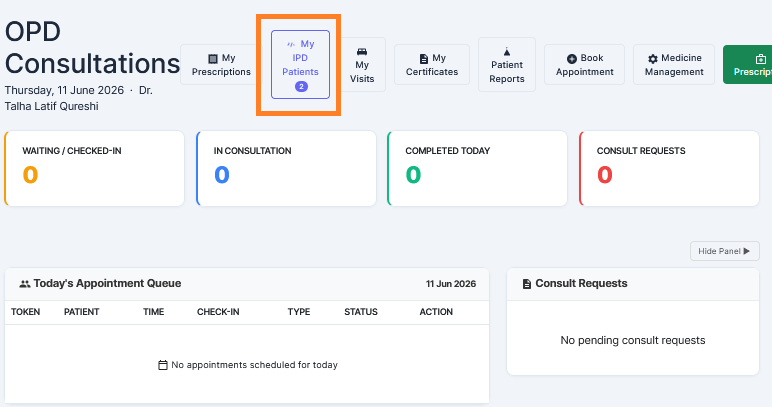
From the top navigation bar, click on My IPD Patients to view admitted patients.
-
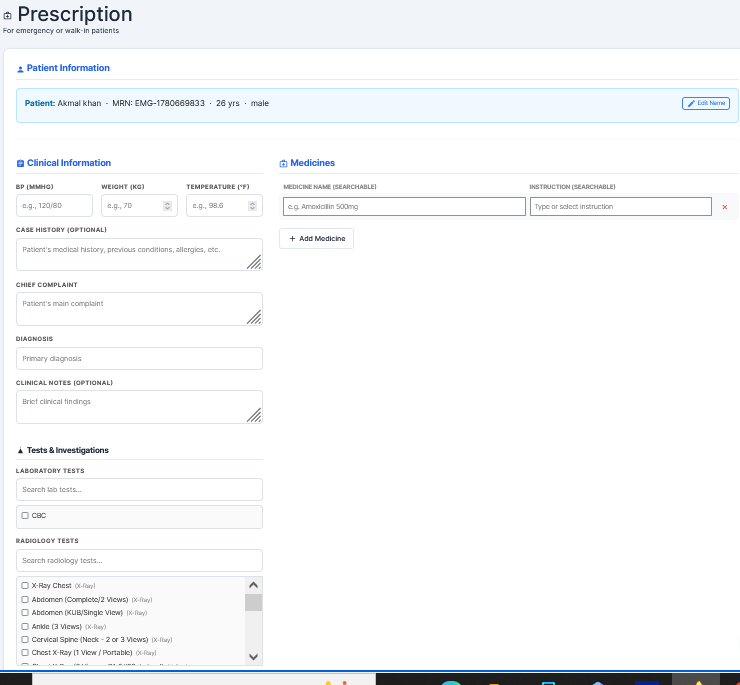
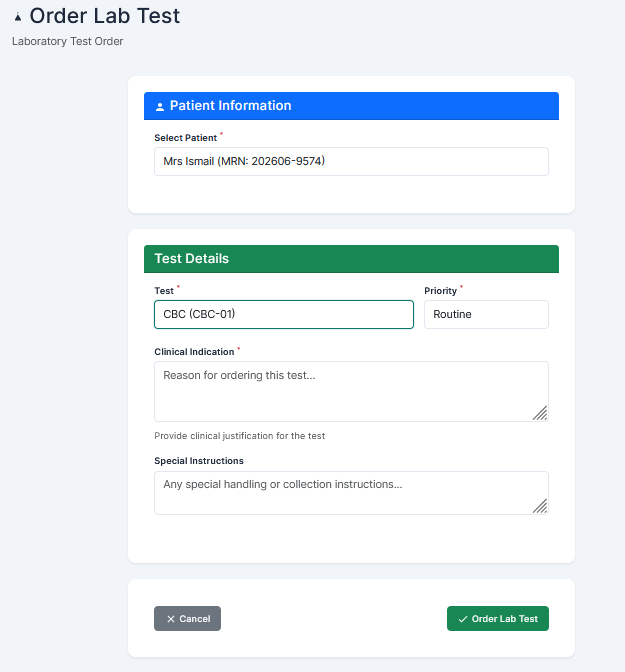
In the Action column of My IPD Patients, you can perform the following actions:
-
-
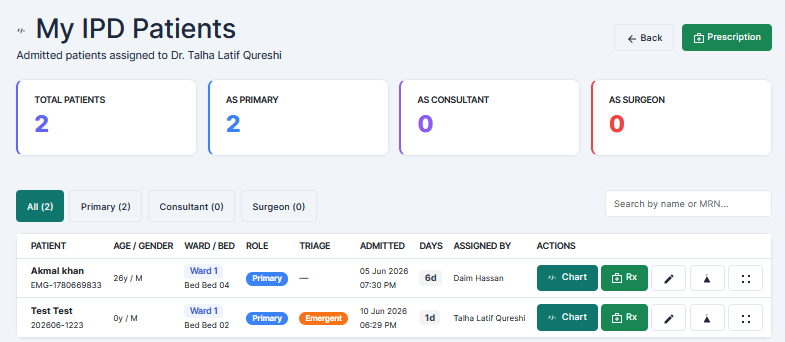 Click on Add Chart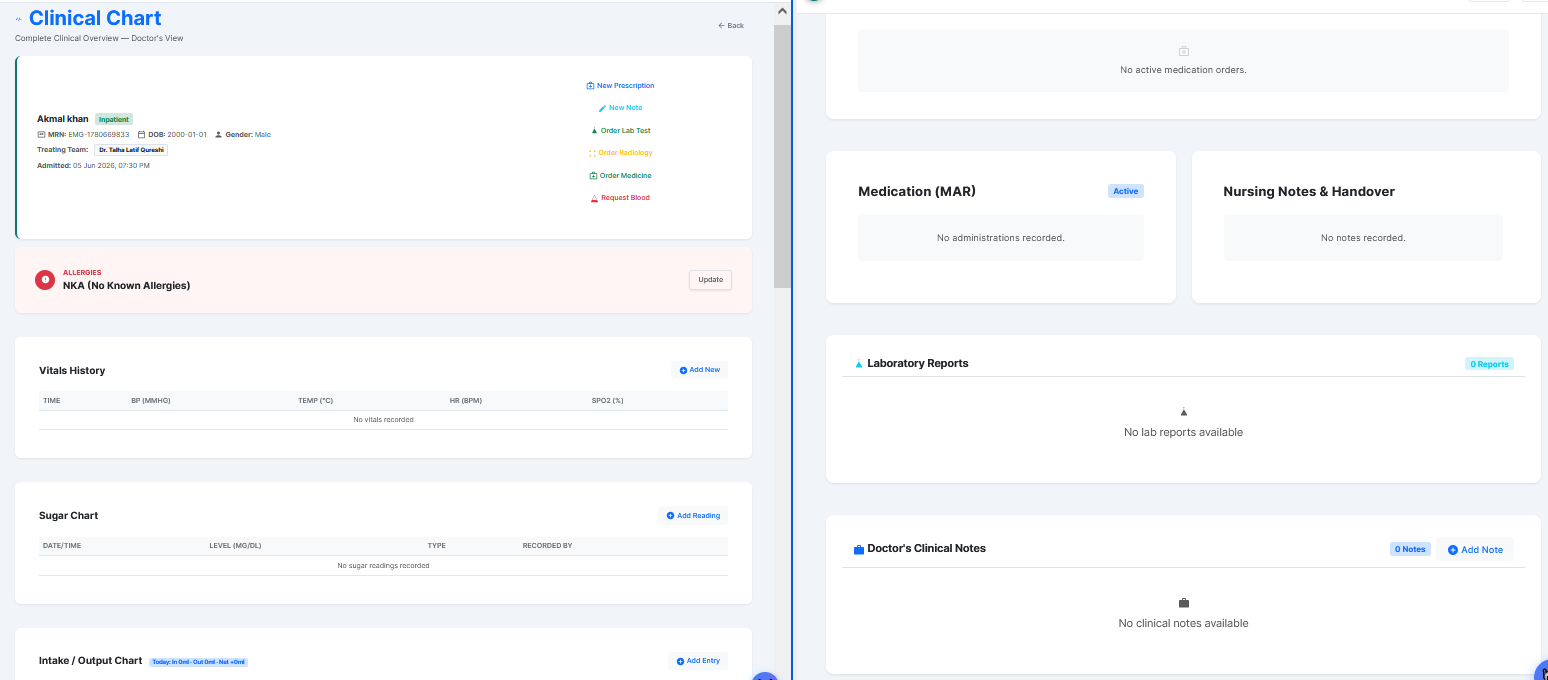
-
Click on Add Prescription
-
Click on Add Test
-
-
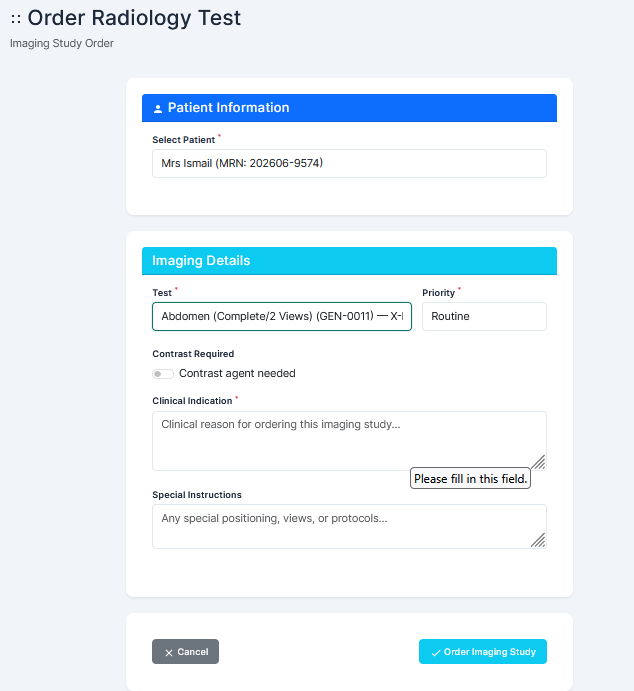
Click on Add Radiology
-
-
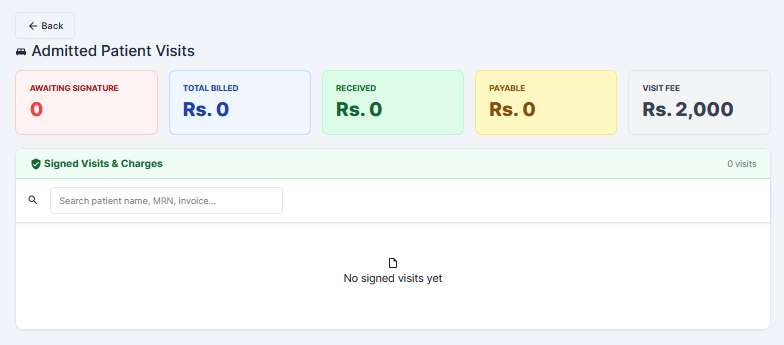
Click on My Visits to view and manage patient visit records.
-
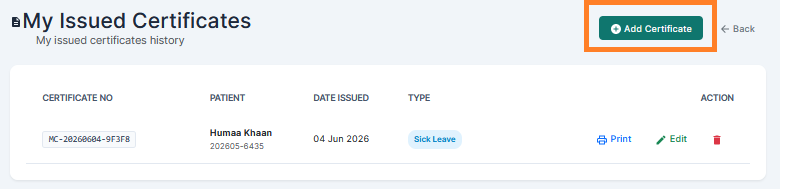
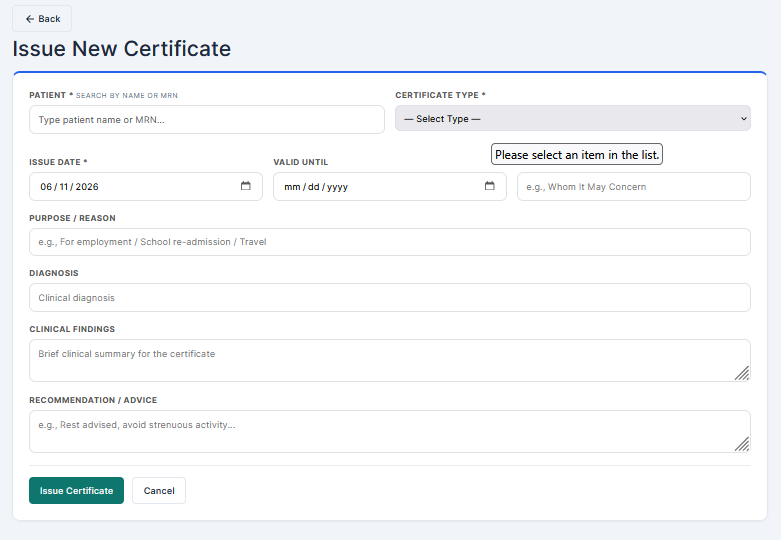
Click on My Certificates to create and manage patient certificates.
- After click on this fill up the all r=fileds to make a certifiacte .
-
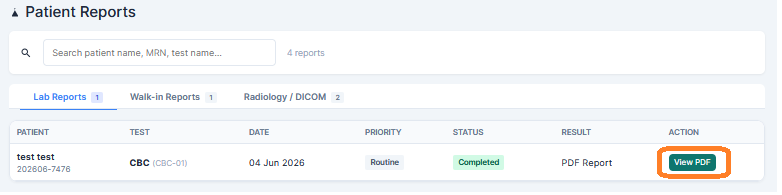
Click on Patient Reports to view patient-related reports.Click on the button to view the report.
-
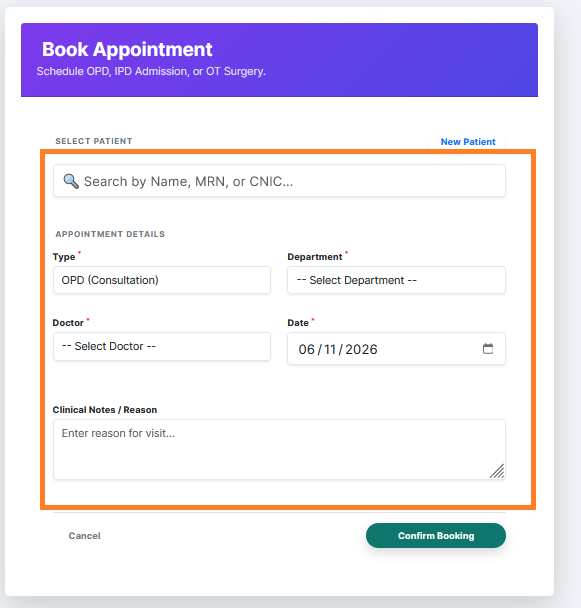
Click on Book Appointment to schedule new patient appointments.
-
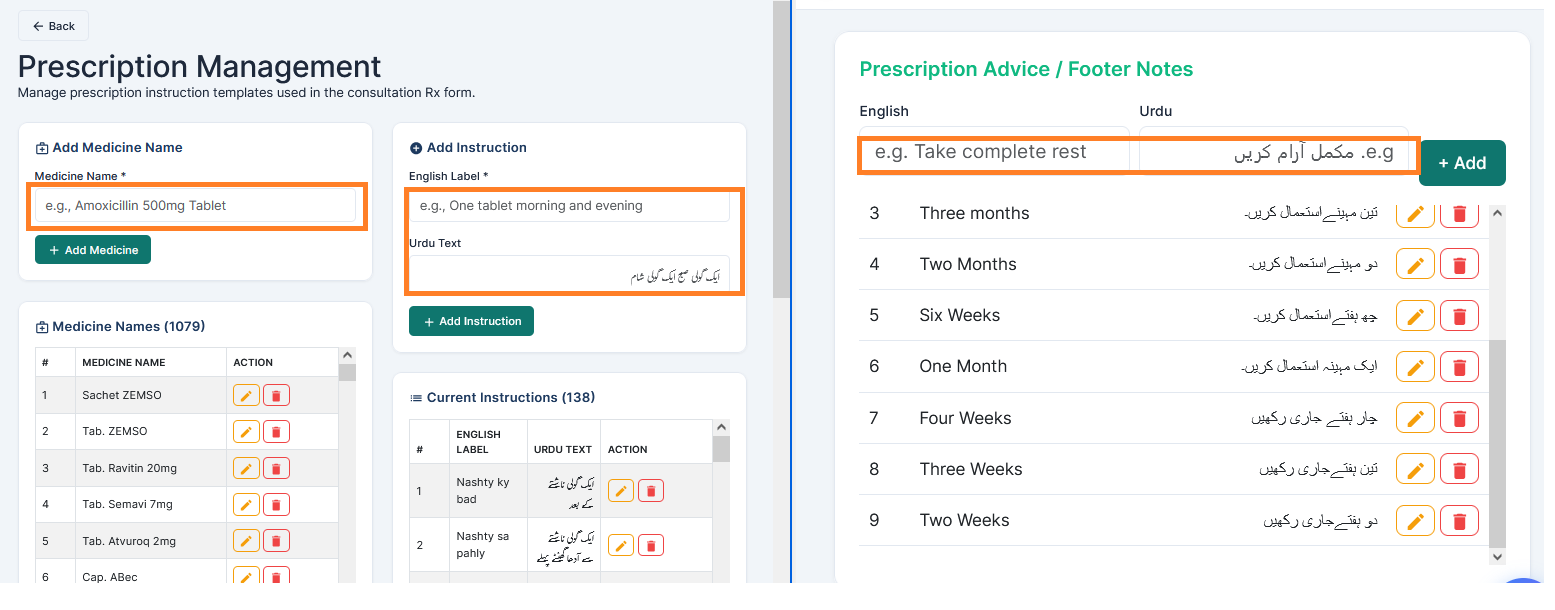
Click on Medicine Management to manage medicines and related information. In this, you add a new medicine, instructions, and footer massage
-
Click on Prescription to view and manage all prescriptions.
-
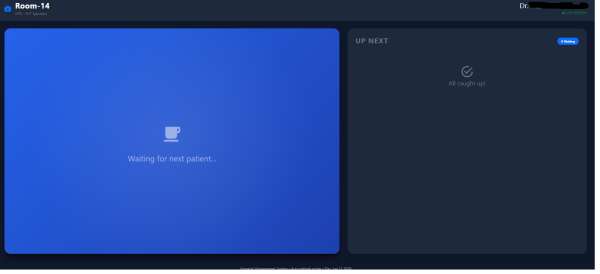
Click on OPD Queue to view and manage the current OPD patient queue.
Note: Any button or section shown in a highlighted box should be clicked to proceed to the next step.
Q: How can I add a test and view/watch orders?
A: Follow the steps below to manage tests and orders:
-
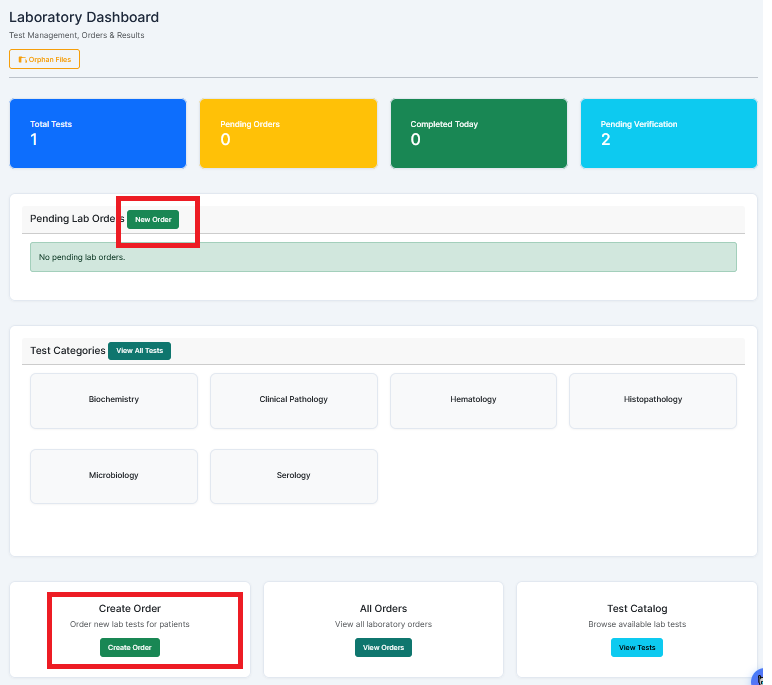
Go to the Clinical Services Dashboard and open the Laboratory section (shown in the highlighted box).
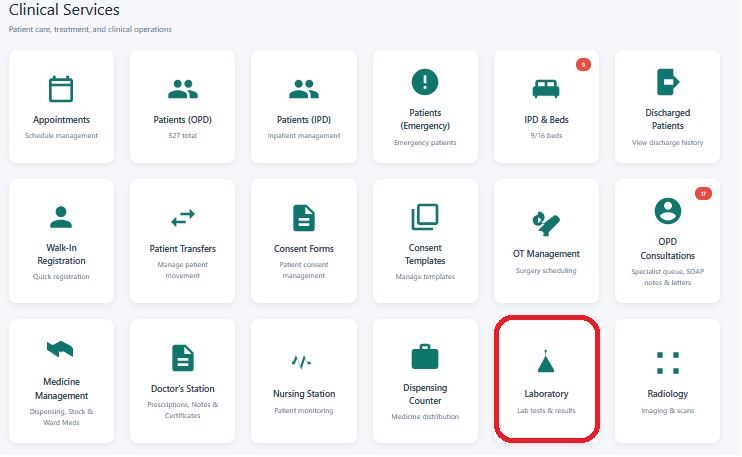
-
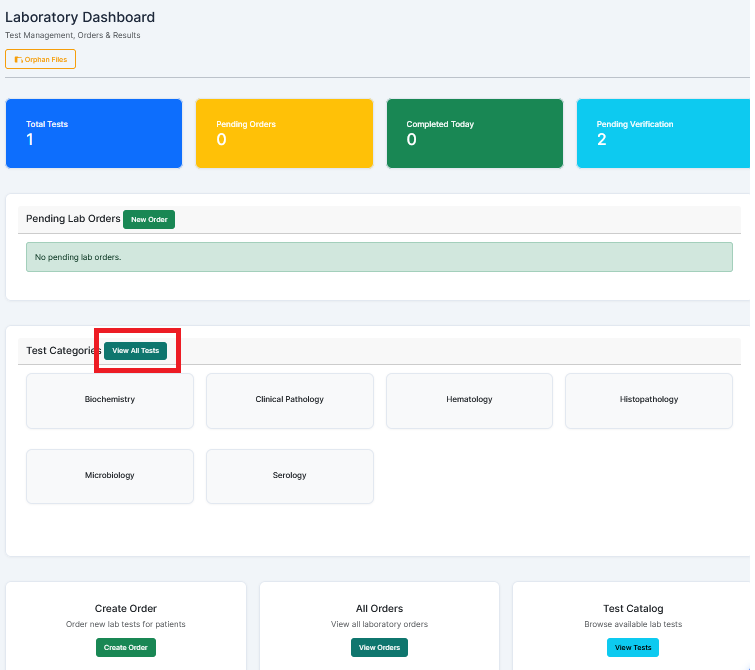
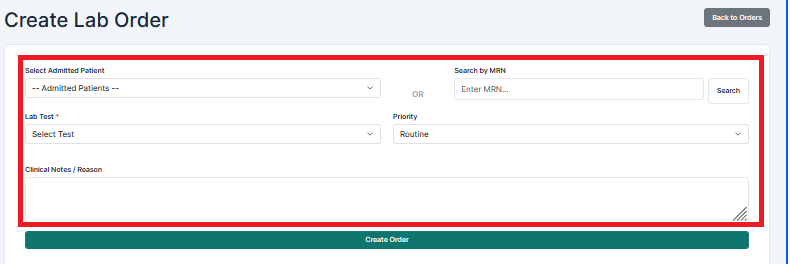
From the patient screen, click on the Add Test option (shown in the highlighted box). Select the required test(s), fill in the necessary details, and click Create Order. To view the order, click on View Orders. To view the test details, click on View Test.
-
- When you click on the " add test button, they fill in all the fields to save this test.
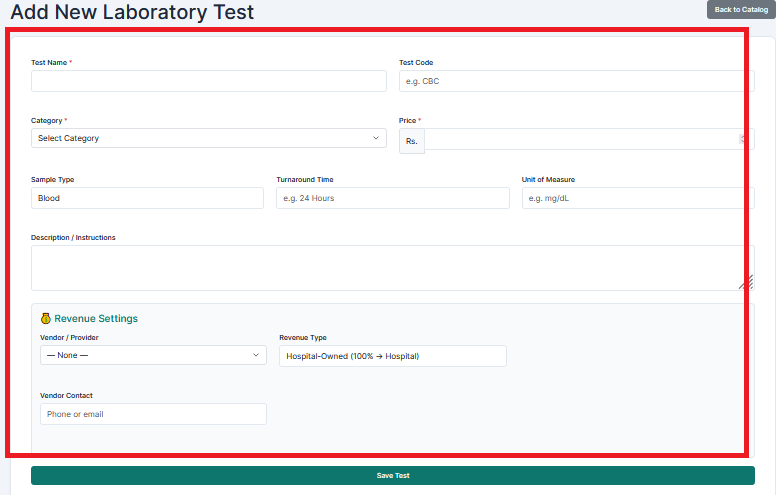
-
Select the required test(s) from the available list.
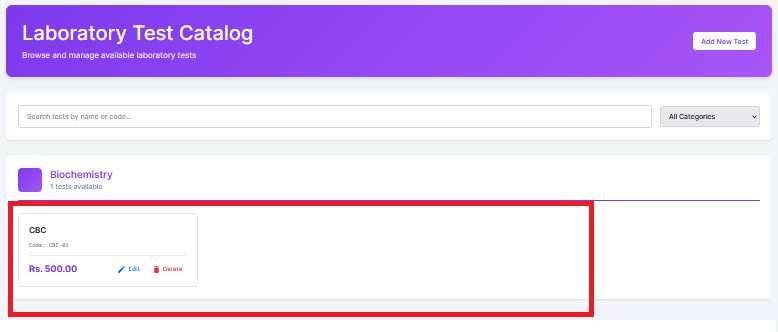
-
Fill in any required details and click Save to add the test successfully.
-
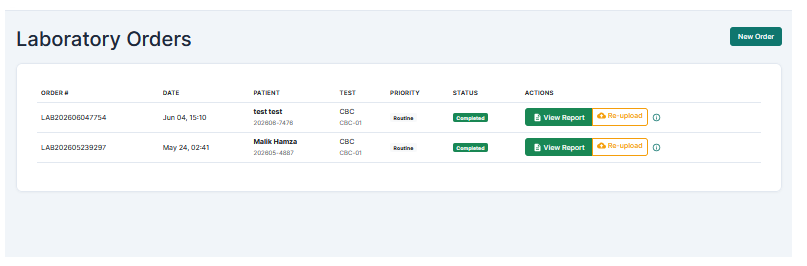
To view and track orders, click on the View Orders option (shown in the highlighted box).
- When you click Create order, it requires fields to complete this.
-
The system will display a list of all submitted orders along with their current status.
-
Click on any order to view detailed information or to monitor progress.
Note: Any button or section shown in a highlighted box should be clicked to proceed to the next step.
Q: How can I upload and view X-Ray, CT Scan, or MRI files?
A: Follow the steps below to manage this:
- Go to the Clinical Services Dashboard and select the Radiology option.
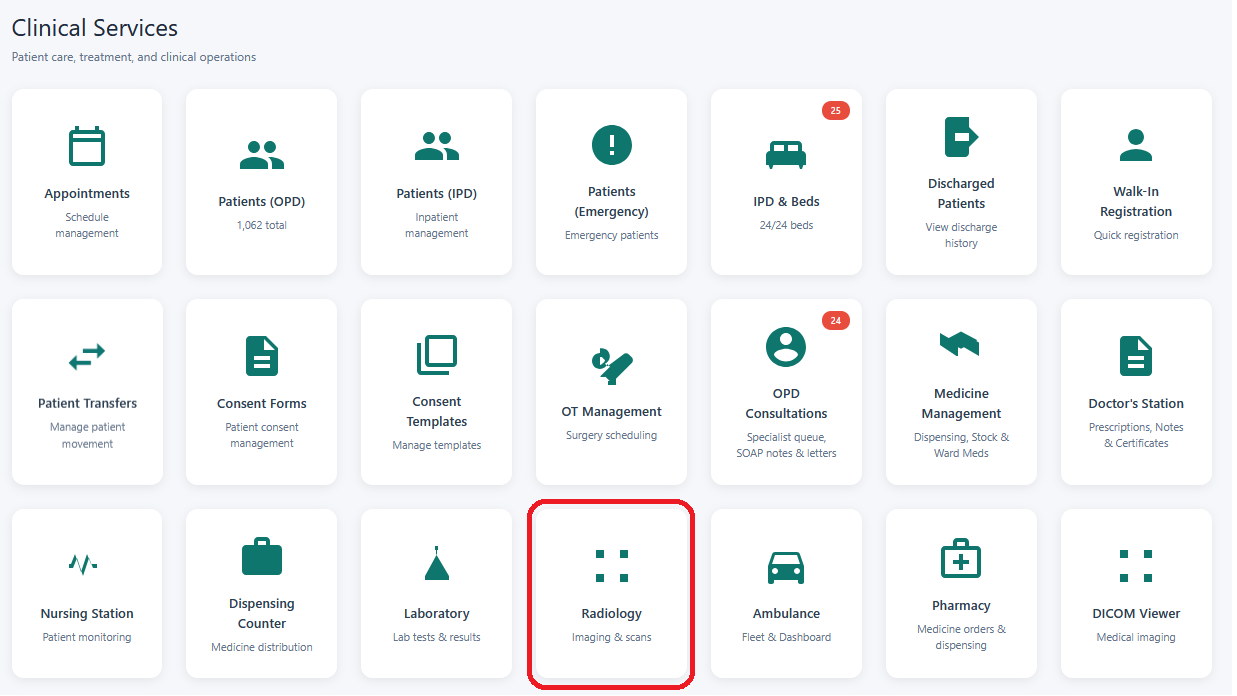
- Click Manage Tests to view the radiology test list.
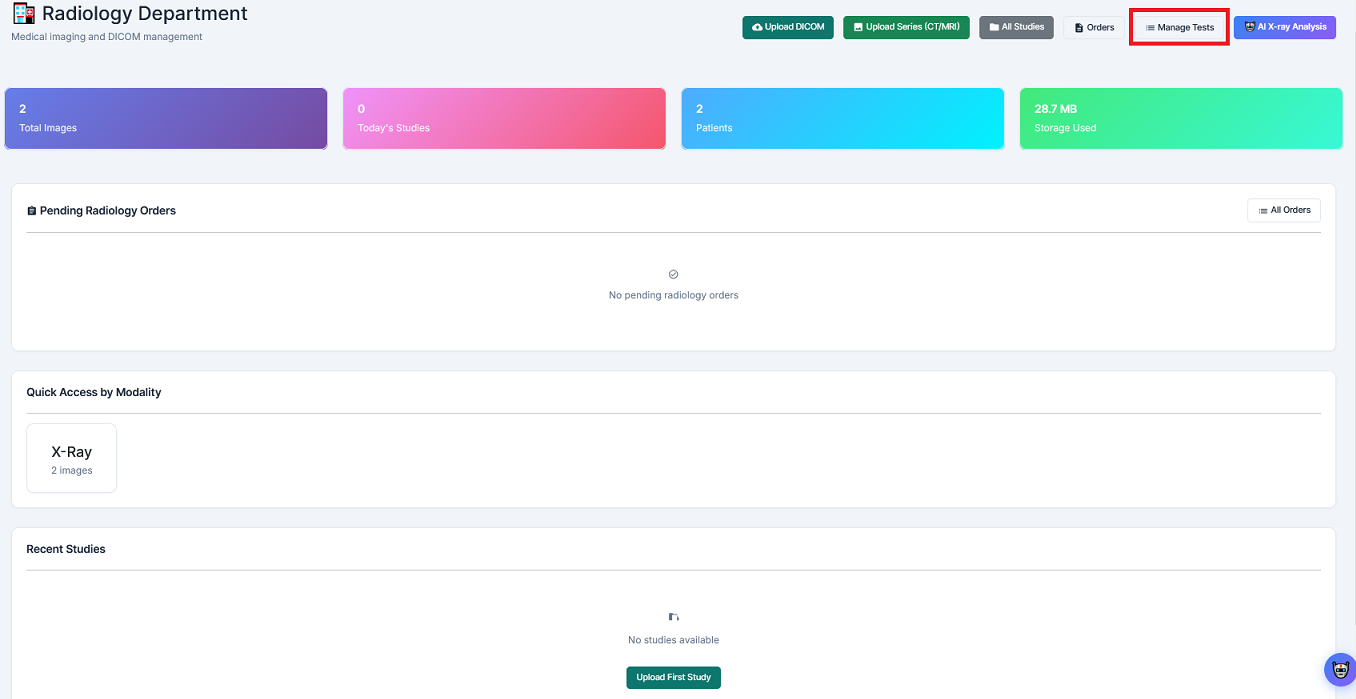
- After clicking the manage test, they show a list of the radiology tests.
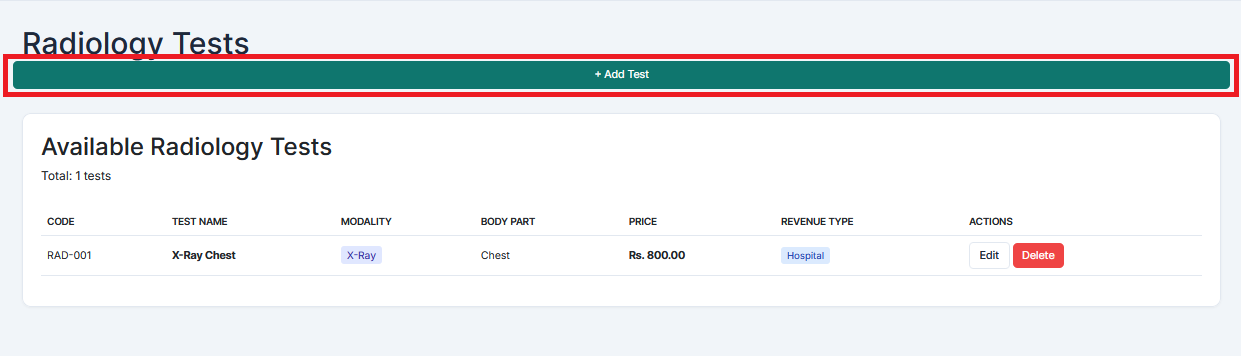
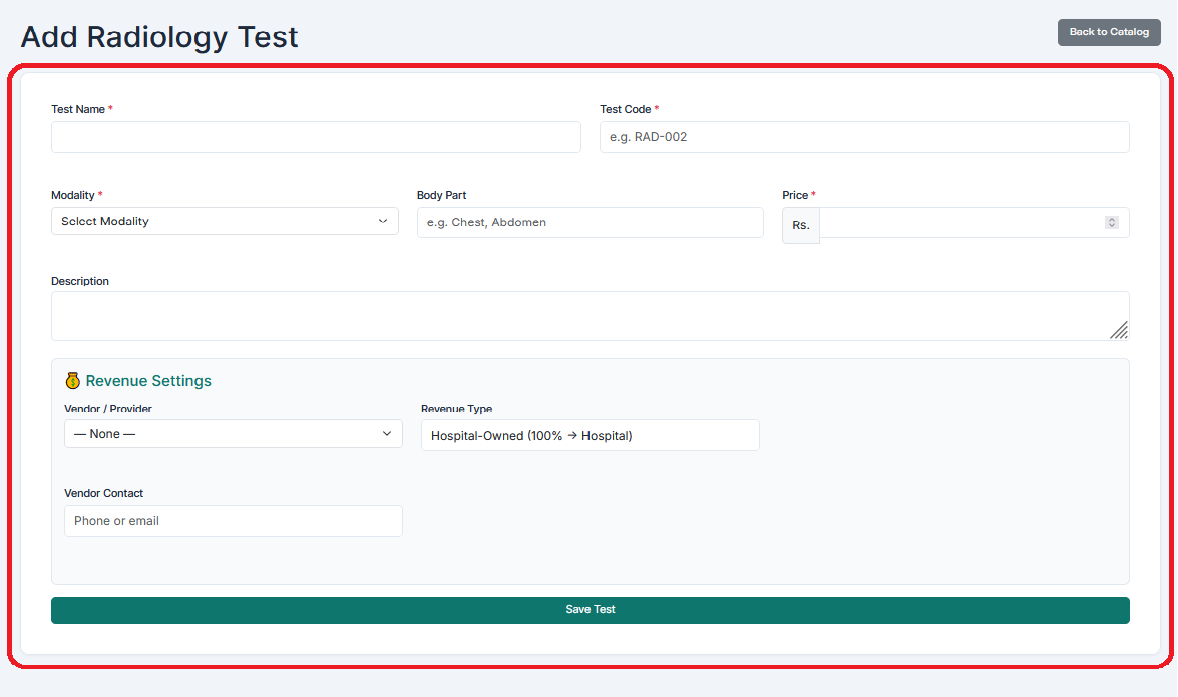
- Click Add Test and fill in the required fields to create a new test (if needed).
- Return to the Radiology Department window.Click Orders to view the order list.
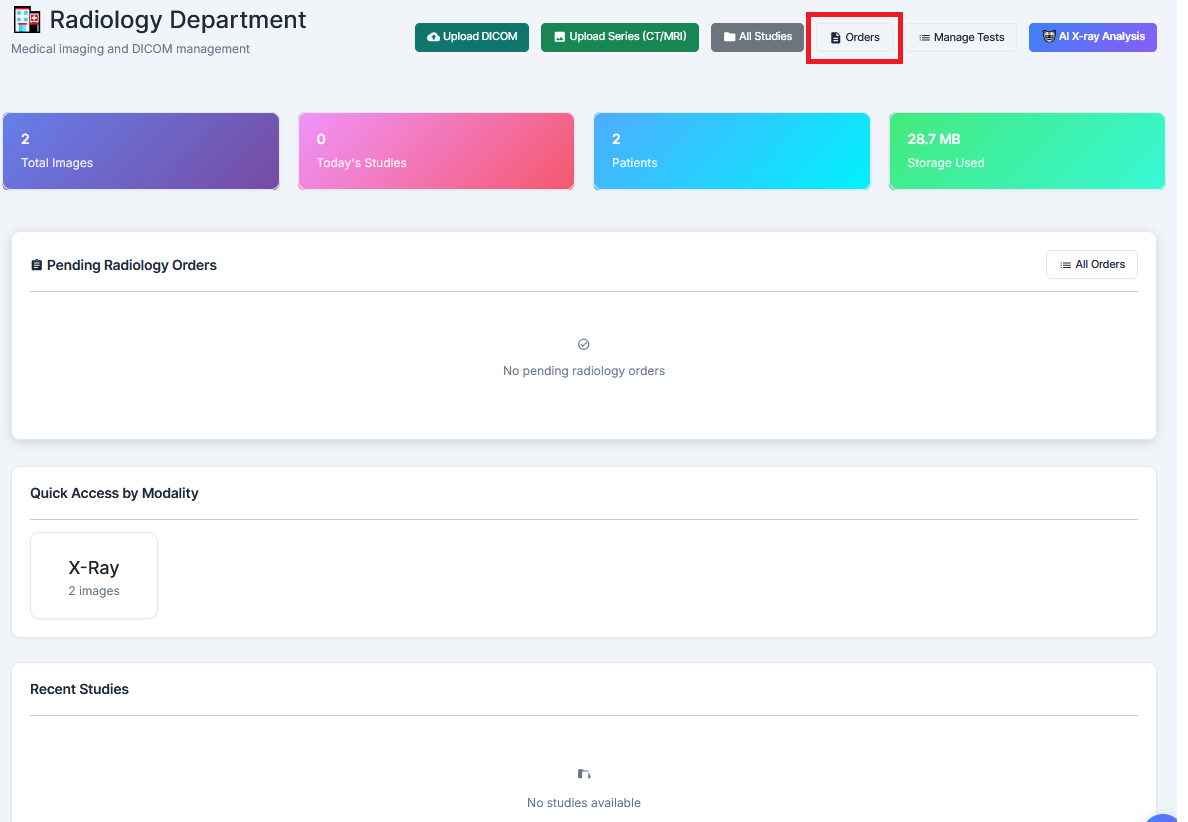
- All order list
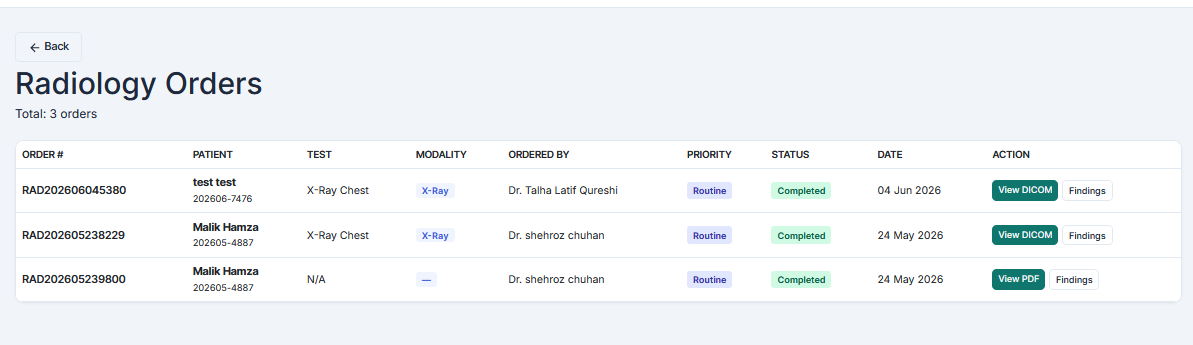
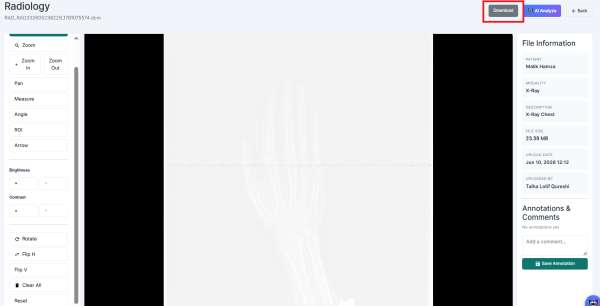
- Select the required order from the list. View or download the X-Ray, CT Scan, or MRI files.
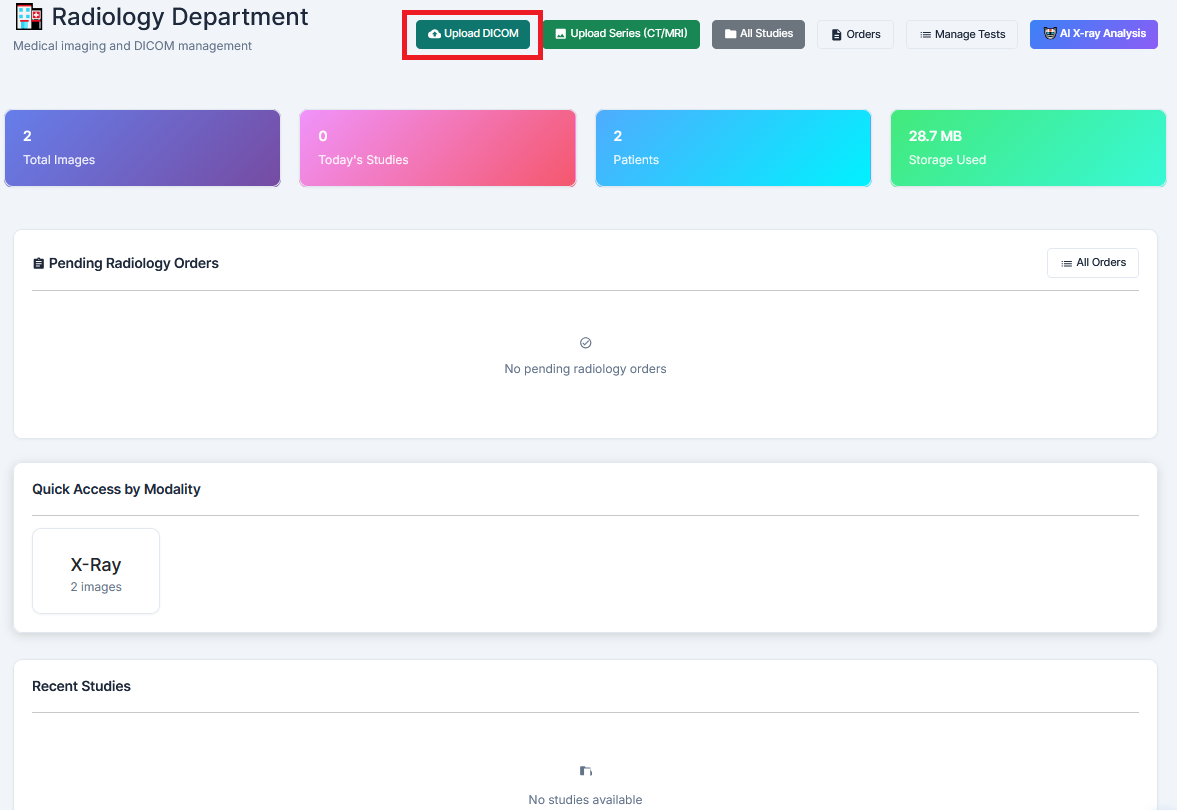
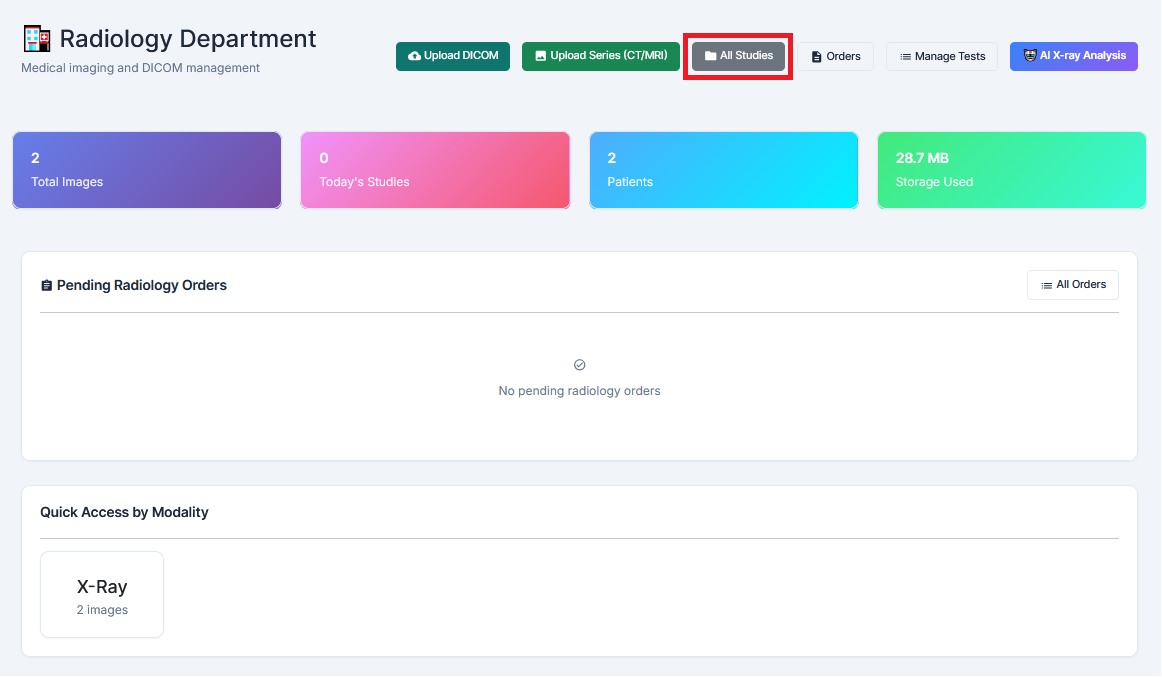
- Return to the Radiology Department window.Click Upload DICOM and fill in the required fields.
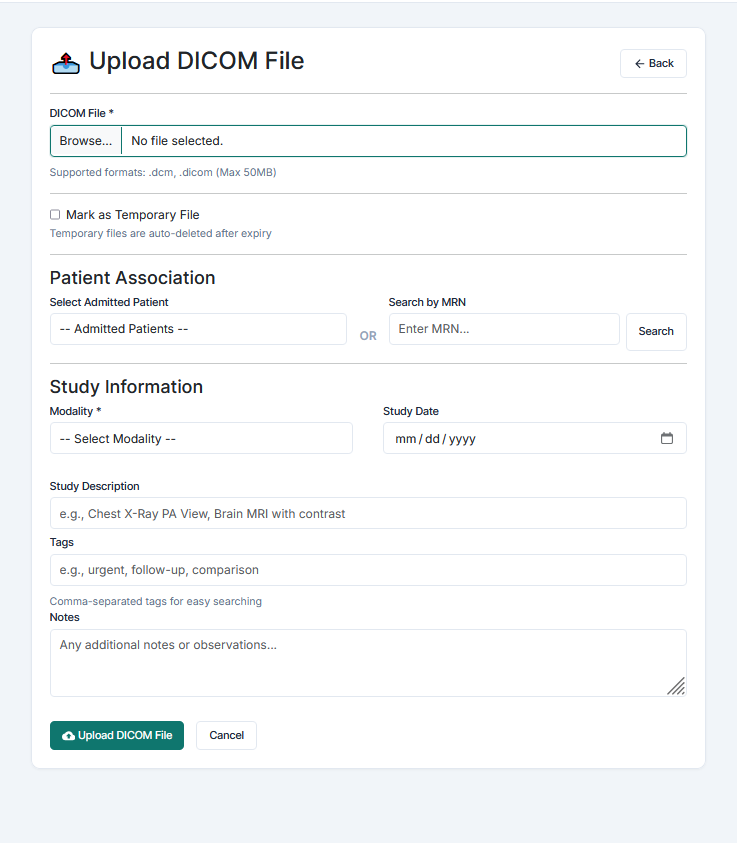
- Select the DICOM file or fille the all required fields and then click Upload DICOM File.
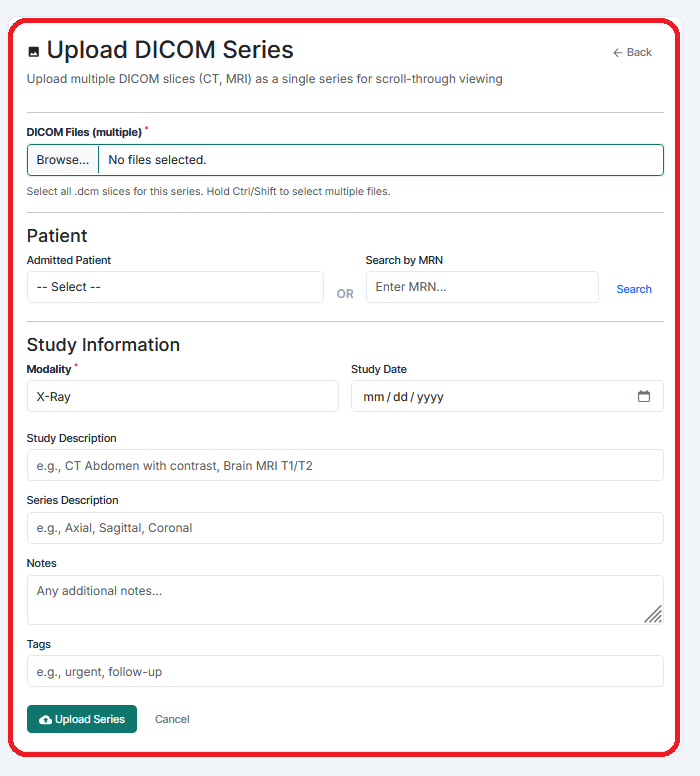
- Click Upload DICOM Series if you want to upload multiple DICOM files.Fill in the required fields and upload the DICOM series.
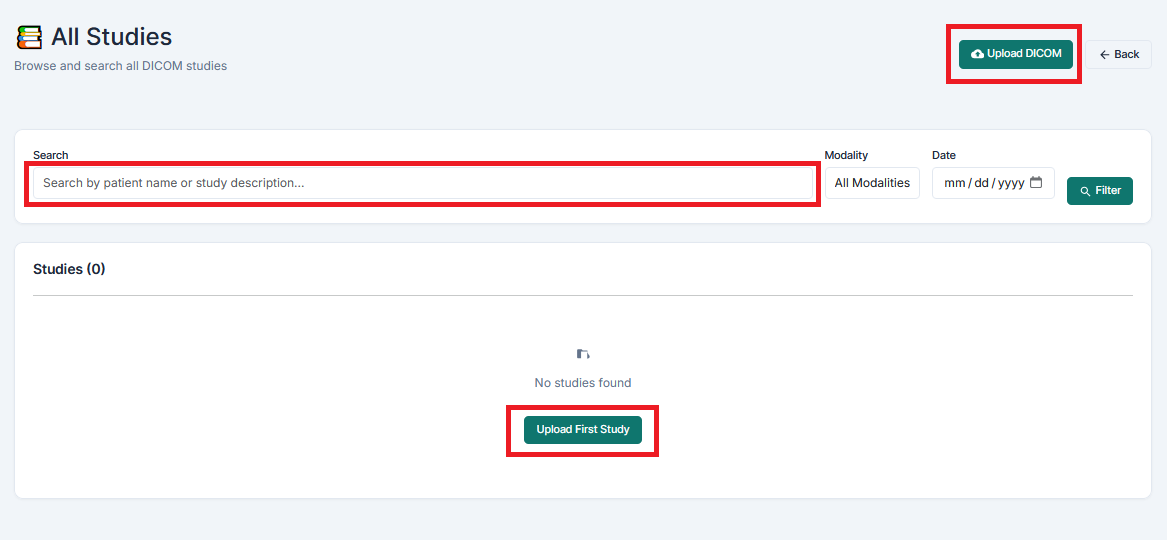
- Click All Studies to view the list of all uploaded studies.
- Select a study to view its details and associated images.
next
Thanks for your feedback!